St. Augustine Grass Complete Guide
Stenotaphrum secundatum
St. Augustine grass is the premium shade-tolerant warm-season grass for coastal and southern regions. Known for its thick, blue-green blades and exceptional shade performance, it creates a lush, carpet-like lawn that thrives where Bermuda and Zoysia struggle. While it requires more water and has moderate traffic tolerance, its unmatched shade adaptation and coastal resilience make it the go-to choice for Florida, Gulf Coast, and coastal properties with trees.

At a Glance
The Verdict
St. Augustine grass is the premium choice for shaded coastal and southern lawns where other warm-season grasses fail. Its exceptional shade tolerance (4-6 hours minimum sun) creates lush lawns under live oaks and palms where Bermuda would thin out. While it requires consistent watering, regular fertilization, and vigilant chinch bug monitoring, St. Augustine rewards homeowners with a thick, blue-green carpet that thrives in humid climates. Perfect for Florida, Gulf Coast, and coastal California properties with partial shade, salt spray, and sandy soils. Not suitable for zones 7 and colder due to poor cold tolerance.
Our St. Augustine Master Guide covers advanced lawn care strategies, seasonal programs, and expert tips for achieving a thick, lush St. Augustine lawn.
Why St. Augustine Grass Matters
Stand under the shade of a live oak on a humid Florida afternoon, look down at the thick, blue-green carpet of grass thriving in 60% shade where bermudagrass would be a thin, struggling mess, and you'll understand why St. Augustine grass holds such a special place in coastal lawn care.
After more than 15 years working with turfgrass across multiple climate zones—from residential coastal properties to commercial landscapes—no grass has been more simultaneously rewarding and misunderstood than St. Augustine. It's the grass that makes lush lawns possible under tree canopies. It's the species that tolerates salt spray within sight of the ocean. It's the turf that creates that distinctive coastal aesthetic: thick, coarse, blue-green blades that feel luxurious barefoot.
But it's also the grass that newcomers struggle with most. They fight chinch bugs they don't know how to identify. They over-water in humid climates, creating disease problems. They try to maintain it like bermudagrass and wonder why it fails. They choose the wrong cultivar for their specific shade conditions and spend years fighting a losing battle.
This guide exists to change that.
You Can Master St. Augustine Care
Here's the truth: St. Augustine grass is not difficult to grow successfully—but it is specific. It has unique requirements that differ from bermudagrass, zoysia, or cool-season grasses. Once you understand these requirements and apply the right techniques, St. Augustine becomes one of the most forgiving and rewarding lawn grasses you can grow.
The key is learning to work with St. Augustine's natural characteristics rather than against them:
Coastal Tropical Heritage
Unlike bermudagrass (African savanna origin) or tall fescue (Mediterranean mountains), St. Augustine grass evolved in coastal tropical and subtropical regions. Its native range extends from the southeastern United States through Mexico, Central America, and into the Caribbean.
What this means for you: St. Augustine thrives in warm, humid climates with sandy soils. It naturally tolerates salt spray, occasional flooding, and partial shade—conditions where other grasses struggle.
Shade Tolerance That Actually Works
St. Augustine's wide, coarse blades evolved to capture light in shaded tropical understories. This makes it the only warm-season lawn grass that can maintain acceptable density with just 4-6 hours of daily sun.
What this means for you: You can have a beautiful lawn under live oaks, palms, and other shade trees. But you need to choose the right cultivar (Palmetto, Seville, or CitraBlue excel in shade) and adjust maintenance practices for reduced light.
The Chinch Bug Challenge
Here's the reality: chinch bugs are the #1 pest threat to St. Augustine lawns. They target St. Augustine preferentially over other grasses because of its thick, succulent growth. Thousands of St. Augustine lawns are severely damaged every year by chinch bugs that homeowners mistake for drought stress.
What this means for you: You need to learn the float test, monitor high-risk areas regularly (hot sunny zones near pavement), and take action at the first sign of activity. This guide will teach you exactly how—it's not complicated once you know what to look for.
Proper Mowing Height is Critical
St. Augustine is a coarse-textured grass designed to grow at 3-4 inches—not the 1-1.5 inches many homeowners try to force on it. Mowing too low is the single most common mistake that leads to stress, weeds, and disease.
What this means for you: Set your mower deck to 3-3.5 inches for standard cultivars (Floratam, Palmetto, Raleigh) or 2.5-3 inches for dwarf types (Seville, DelMar), and leave it there. Your lawn will be healthier, denser, and require less work.
What Makes This Guide Comprehensive
Most St. Augustine advice falls into two categories: oversimplified basics ("plant in shade, watch for chinch bugs") or generic warm-season grass advice that doesn't acknowledge St. Augustine's unique requirements. This guide is different because it treats St. Augustine as what it actually is: a unique species with specific requirements, distinct strengths, and particular challenges that demand specialized knowledge.
What You'll Learn:
- Shade management as a primary topic - Not just "it tolerates shade," but exactly how much shade each cultivar handles, how to measure your actual light levels, when to prune trees versus when to accept limitations, and how to adjust every aspect of management for shade versus sun.
- Chinch bugs with the seriousness they deserve - Complete biology, life cycle, early detection techniques (float test mastery), why damage looks identical to drought stress, prevention programs that keep populations below damaging levels, and exactly when and how to apply controls.
- Coastal and humid climate challenges - Salt tolerance rankings by cultivar, hurricane recovery protocols, brown patch and gray leaf spot prevention strategies, irrigation management in high-rainfall climates, and sandy soil nutrition programs.
- Cultivar-specific information throughout - The differences between Floratam, Palmetto, CitraBlue, Captiva, Seville, and others aren't subtle—they're fundamental to success or failure. You'll learn exactly which cultivar matches your specific situation.
- Practical, experience-based guidance - This isn't theoretical information from someone who's read about St. Augustine. It's field-tested knowledge from 15+ years of managing St. Augustine lawns in real-world conditions, making real-world mistakes, and discovering what actually works.
💚 ENCOURAGEMENT: If you're new to St. Augustine grass, don't feel overwhelmed by the depth of information in this guide. You don't need to master everything immediately. Start with the basics—proper mowing height, appropriate watering, basic fertilization—and add knowledge gradually. Most St. Augustine lawns fail not because the grass is difficult, but because homeowners apply bermudagrass techniques or don't recognize chinch bug damage early enough. Once you understand these key differences, St. Augustine becomes remarkably forgiving and rewarding. You've got this.
How to Use This Guide
This guide is organized to serve both quick reference needs and deep learning:
- New to St. Augustine? Start with the Visual Identification section below to confirm you actually have St. Augustine (not centipede or carpet grass, which are often confused). Then read the Mowing, Fertilization, and Irrigation sections to establish proper baseline maintenance. Finally, study the Chinch Bug Management section to learn the most critical species-specific skill.
- Solving a specific problem? Use the table of contents or section headings to jump directly to the relevant topic. Each major section is self-contained with complete information and actionable guidance.
- Planning a new lawn? Focus on the Cultivar Selection section to choose the right variety for your specific light conditions, climate, and maintenance preferences. Then study the Establishment section for installation and first-season management.
- Looking to elevate an existing lawn? Work through the advanced sections on seasonal timing, preventive programs, and cultural practices like dethatching and aeration. Small improvements in timing and technique create significant results.
Let's get started with understanding what makes St. Augustine grass unique, how to identify it correctly, and how to create the lush, healthy coastal lawn this remarkable grass is capable of producing.
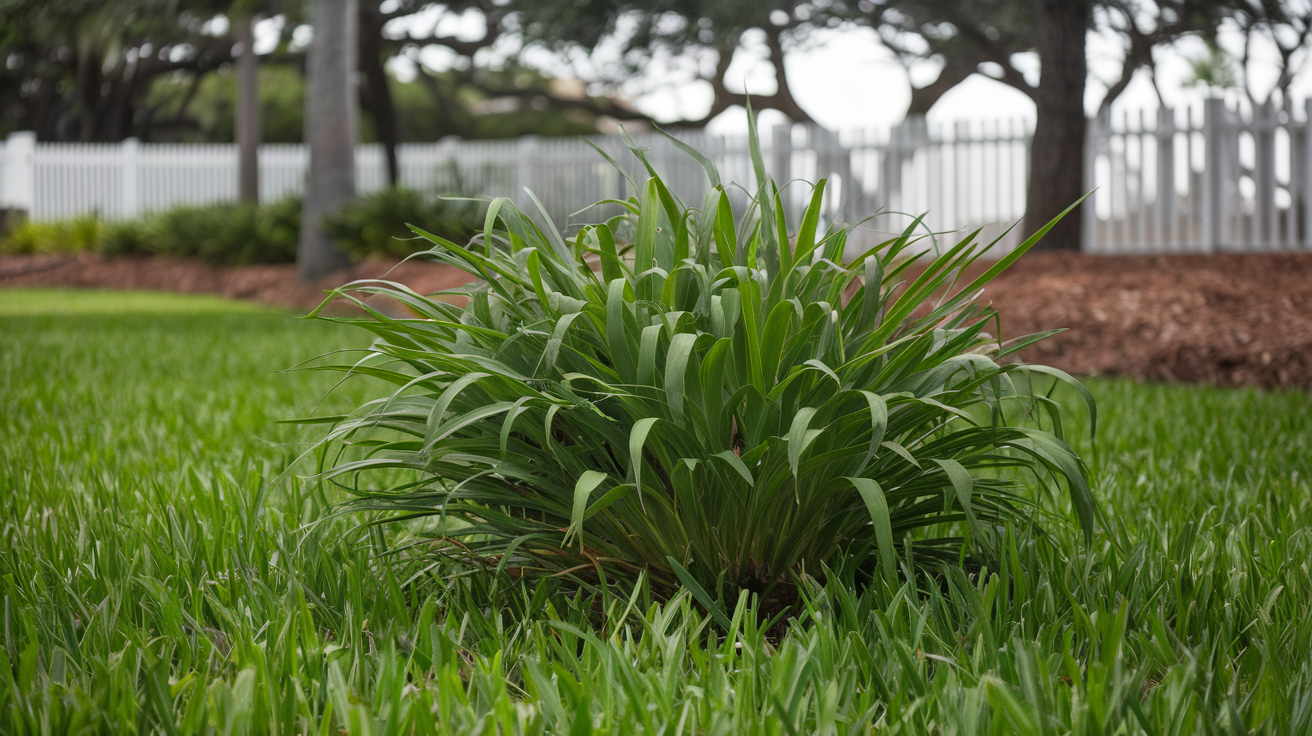
Visual Identification Guide
Blade Characteristics
- Blade Width: 8-10mm (very coarse - widest of common lawn grasses)
- Blade Shape: Narrow with pointed tips
- Texture: Stiff, wiry, carpet-like feel (coarser than Bermuda)
- Color: Medium to dark green, can have slight blue tint
- Feel: Noticeably stiffer and coarser than Bermuda when running hand across it
Growth Pattern
- Spread Method: Stolons only (above-ground runners - NO rhizomes)
- Stolons: Thick, visible above ground; slower spreading than Bermuda
- Rhizomes: NONE - St. Augustine spreads exclusively via stolons
- Growth Rate: Moderate (slower than Bermuda, faster than Centipede)
- Density: Creates thick, carpet-like turf when properly maintained
Seasonal Appearance
- Spring: Slow to green up, light green to yellow-green as breaks dormancy (late April-May)
- Summer: Peak color - deep, rich green; handles heat exceptionally well
- Fall: Maintains green longer than Bermuda, begins slowing in late fall
- Winter: Goes dormant turning tan/brown; remains dormant longer than Bermuda
Root System
- Depth: 4-6 inches (relatively shallow - requires consistent moisture)
- Structure: Dense, fibrous roots from stolons (no rhizomes)
- Anchoring: Stolons root at nodes creating stable turf
- Thatch: Can build up thatch from coarse leaf blades and stolons
Similar Grasses (How to Tell Them Apart)
vs Bermuda Grass
Key Difference: St. Augustine has much wider, coarser blades (8-10mm) compared to Bermuda's fine texture (1.5-2mm). St. Augustine excels in shade (4-6 hours sun minimum) while Bermuda needs full sun (6-8+ hours). St. Augustine spreads only via stolons; Bermuda uses both stolons and rhizomes.
Quick Test: Blade width is obvious - St. Augustine blades are very wide and visible. Bermuda is fine and soft. St. Augustine thrives in shade where Bermuda struggles.
vs Zoysia Grass
Key Difference: St. Augustine has much wider blades (8-10mm coarse) compared to Zoysia's fine-medium texture (2-5mm). Zoysia has both stolons AND rhizomes and tolerates much colder temperatures, while St. Augustine has only stolons and is limited to warmer climates (Zone 8+).
Quick Test: Blade width is the easiest identifier. If blades are very wide and visible, it's St. Augustine. Zoysia blades are much narrower and feel denser/stiffer underfoot.
vs Centipede Grass
Key Difference: St. Augustine is darker green and more dense than Centipede's lighter apple-green color. Centipede can't handle heavy traffic; St. Augustine excels at it. St. Augustine requires more nitrogen fertilizer while Centipede needs very little.
Quick Test: Color difference is obvious - Centipede is light apple-green, St. Augustine is dark green. St. Augustine feels much denser and stiffer underfoot.
Climate Requirements & Growing Zones
USDA Hardiness Zones: 8-11 (Optimal: 8-10)
St. Augustine grass thrives in warm, coastal climates with limited cold tolerance. It's damaged around 25°F and killed below 20°F, making it suitable only for zones 8 and warmer. This is one of the LEAST cold-tolerant warm-season grasses, but it compensates with exceptional shade tolerance and coastal adaptation.
Optimal Growing Conditions
🌡️ Temperature Requirements
Optimal Growth: 80-95°F
Heat Tolerance: Excellent – thrives in coastal heat and humidity
Cold Tolerance: Poor – damaged around 25°F, killed below 20°F
Green-Up: Soil temps above 65°F trigger spring growth (March-April in coastal zones)
Dormancy: Goes dormant below 55°F; browns in winter zones 8-9
💧 Water & Humidity Requirements
Annual Rainfall: 40+ inches per year (humid climates)
Drought Tolerance: Moderate – needs consistent moisture (shallow 4-6" roots)
Humidity Preference: High – thrives in humid coastal climates
Irrigation Needs: 0.75-1" per week; more in sandy soils or full sun
Recovery: Wilts quickly under drought stress; requires regular watering
☀️ Sunlight Requirements
Requirement: Full sun to moderate shade (4-6+ hours minimum)
Minimum: 4-5 hours direct sunlight (some cultivars tolerate less)
Shade Tolerance: Excellent – THE BEST shade-tolerant warm-season grass
In Shade: Best shade cultivars: Palmetto (4-5 hrs), Seville (5 hrs), Amerishade (4-5 hrs)
Why Different: Wide blades capture more light; evolved in shaded tropical forests
🌍 Soil Requirements
pH Range: 5.5-7.0 (prefers 6.0-6.5)
Soil Type: Adaptable – grows in sand, clay, loam
Drainage: Moderate drainage required; doesn't like standing water
Texture: Sandy loam to clay (very tolerant of different soil types)
Compaction: Moderate tolerance
Regional Performance Guide
✅ Excellent Regions (Primary Range)
- Coastal Florida (USDA Zones 9-11) - THE SWEET SPOT: Central/South Florida, Keys – Warm year-round, high humidity, mild winters. St. Augustine dominates as the #1 lawn grass.
- Gulf Coast (Zones 9-10): Coastal Alabama, Mississippi, Louisiana, Texas – Perfect climate with shade from live oaks. Thrives in humid heat and sandy soils.
- Coastal California (Zones 9-10): Southern California coast – Mild year-round temperatures, tolerates salt spray. Works well in partial shade.
👍 Good Regions (With Considerations)
- North Florida & Coastal Georgia (Zone 8-9): Jacksonville, Tallahassee, Savannah – Expect winter dormancy and occasional cold damage. Use cold-hardy cultivars like Palmetto or Raleigh.
- Coastal Carolinas (Zone 8): Charleston, Wilmington, Myrtle Beach – Northern limit for St. Augustine. Protect from winter freezes. Palmetto performs best.
- South Texas (Zones 9-10): Houston, Corpus Christi, Brownsville – Excellent climate but watch for chinch bugs. Use Floratam for pest resistance.
⚠️ Challenging Regions (Not Recommended)
- Zone 7 and Colder: Anywhere north of coastal South Carolina – Too cold; St. Augustine will not survive winters reliably. Use Bermuda, Zoysia, or cool-season grasses instead.
- Desert Southwest: Arizona, New Mexico, Nevada – Extreme heat combined with low humidity stresses St. Augustine. Bermuda is much better choice.
- High Altitude: Above 2,000 ft elevation – Temperature swings too extreme. Cool-season grasses only.
Best Cultivars by State
For state-specific turfgrass recommendations, consult your local Cooperative Extension Service.
- Florida: Floratam (chinch bug resistance), Palmetto (shade), CitraBlue (color) - UF/IFAS Extension
- Texas (Coastal): Floratam, Palmetto, Raleigh - Texas A&M AgriLife Extension
- Louisiana: Floratam, Raleigh, Palmetto - LSU AgCenter
- Alabama (Coastal): Palmetto, Floratam, Classic - Alabama Extension
- Georgia (Coastal): Palmetto (best cold tolerance), Captiva (dwarf), Floratam - UGA Extension
- California (Coastal): Seville, Palmetto, Classic - UC Extension
St. Augustine Grass Pros & Cons
✅ Strengths
1. Exceptional Shade Tolerance
St. Augustine is THE BEST shade-tolerant warm-season grass, thriving with as little as 4-6 hours of direct sunlight. Its wide blades evolved to capture light in shaded coastal tropical forests, making it perfect for lawns with trees, where Bermuda and Zoysia would thin out. Shade cultivars like Palmetto, Amerishade, and Seville can maintain in even heavier shade (4-5 hours minimum).
2. Thick, Lush Carpet-Like Lawn
St. Augustine's coarse blades (widest of any lawn grass at 8-10mm) create a thick, lush carpet that feels luxurious barefoot. The distinctive blue-green color and dense growth pattern create that classic coastal lawn aesthetic. When properly maintained, it forms a thick turf that naturally crowds out weeds.
3. Excellent Salt Tolerance
Evolved in coastal tropical environments, St. Augustine tolerates salt spray and coastal conditions better than most warm-season grasses. Perfect for properties within sight of the ocean, can handle occasional saltwater flooding, and thrives in sandy coastal soils. Floratam and Palmetto cultivars show particularly good salt tolerance.
4. Moderate Traffic Tolerance
St. Augustine handles normal family foot traffic well, making it suitable for residential lawns with kids and pets. While not as wear-resistant as Bermuda, it recovers moderately from damage and maintains appearance under moderate use. The thick growth helps it bounce back from occasional heavy use.
5. Thrives in Humid Climates
St. Augustine loves heat and humidity, thriving in conditions that stress other grasses. Perfect for coastal Gulf states, Florida, and humid southern regions. Performs excellently in 80-100°F heat with high humidity, making it the go-to choice for hot, humid coastal zones.
6. Sandy Soil Adaptation
Evolved in coastal sandy soils, St. Augustine grows well in low-nutrient sandy conditions where other grasses struggle. Its stolons spread efficiently across sand, rooting at nodes to stabilize the soil. Perfect for coastal properties and areas with naturally sandy, well-draining soils.
7. Moderate Maintenance Once Established
While St. Augustine requires attention to chinch bugs and watering, overall maintenance is reasonable for a warm-season grass. Mow every 7-10 days at 3-4 inches, fertilize 3-4 times per year, and monitor for pests. Less aggressive spreading than Bermuda means less edging of beds and walkways.
8. No Seed Needed - Vegetative Only
St. Augustine doesn't produce viable seed, so it must be installed via sod, plugs, or sprigs. This means you'll never deal with reseeding bare spots or maintaining seed beds. Once established, it fills in gaps via stolons without the mess of seeding.
❌ Limitations
1. Chinch Bug Susceptibility - The #1 Threat
Southern chinch bugs (*Blissus insularis*) are THE biggest problem for St. Augustine grass, causing millions of dollars in damage annually. These tiny insects suck plant juices, inject toxins, and cause circular dead patches that look like drought stress. Floratam has resistance, but other cultivars are highly susceptible. Solution: Monitor weekly with float test during hot weather, treat immediately when detected, use preventive insecticide in high-risk areas.
2. Requires Consistent Watering
St. Augustine has shallow roots (4-6 inches) and MODERATE drought tolerance, meaning it needs consistent moisture—especially in sandy coastal soils. Wilts quickly under drought stress, requires 0.75-1 inch per week, and shows stress faster than Bermuda or Zoysia. Reality: Expect to irrigate regularly during dry spells, especially in full sun areas.
3. Poor Cold Tolerance
St. Augustine is damaged around 25°F and killed below 20°F, limiting it to zones 8 and warmer. It's one of the LEAST cold-tolerant warm-season grasses. Goes dormant (browns out) in zones 8-9 during winter, doesn't survive zone 7 winters reliably, and northern freeze damage is common. Alternative: Use Bermuda or Zoysia for better cold tolerance.
4. Disease Susceptibility in Humid Climates
St. Augustine is prone to brown patch (spring/fall), gray leaf spot (summer), and take-all root rot (TARR) in alkaline soils. Humid coastal climates create ideal disease conditions. Fungicide applications may be needed 2-4 times per year in problem lawns. Prevention: Water early morning only, avoid over-fertilization, improve air circulation.
5. Coarse Texture - Not for Everyone
St. Augustine has the widest blades (8-10mm) of any lawn grass, creating a coarse texture that some find less appealing than fine-textured Bermuda or Zoysia. The thick blades can feel rough barefoot, don't create the "golf course" look that fine grasses do, and some HOAs prohibit it for aesthetic reasons. Consider: If you want fine-textured turf, choose Bermuda or Zoysia instead.
6. Higher Maintenance Than Advertised
While sometimes marketed as "low maintenance," St. Augustine actually requires regular attention: weekly chinch bug monitoring in summer, consistent fertilization (3-4 lbs N annually), regular watering schedule, thatch management every 2-3 years, and disease monitoring. Reality: Not a "set and forget" grass—requires vigilance and proactive management.
Best Uses for St. Augustine Grass
🌳 Shaded Coastal Lawns
THE BEST warm-season grass for partial shade (4-6 hours sun). Perfect for lawns with live oaks, palms, and tree cover where Bermuda fails.
🌊 Coastal Properties
Thrives in salt spray, sandy soils, and humid coastal climates. Ideal for Gulf Coast, Florida, and California coastal homes within sight of the ocean.
🏡 Florida & Gulf Coast Residential Lawns
The #1 grass for Florida homeowners. Creates thick, lush coastal aesthetic. Perfect for humid heat and regular rain.
🏖️ Sandy Soil Areas
Evolved in coastal sandy soils—spreads well and tolerates low-nutrient sand better than most warm-season grasses.
👨👩👧👦 Family Lawns with Trees
Moderate traffic tolerance handles kids and pets well. Shade tolerance means you don't have to choose between trees and grass.
☀️ Hot, Humid Climates
Thrives in 80-100°F heat with high humidity. Perfect for areas where heat and moisture stress other grasses.
Not Ideal For
- Zone 7 and Colder: Poor cold tolerance—damaged at 25°F, killed below 20°F. Use Bermuda, Zoysia, or cool-season grasses instead.
- Full Sun Lawns in Dry Climates: Moderate drought tolerance requires consistent watering. Bermuda is better for hot, dry, sunny areas.
- Athletic Fields or High-Traffic Commercial: Moderate traffic tolerance isn't enough for heavy use. Bermuda recovers faster and handles more wear.
- Homeowners Avoiding Pest Management: Chinch bugs are a constant threat requiring monitoring and treatment. If you won't monitor weekly, choose Bermuda.
- Heavy Shade (< 4 hours sun): Even St. Augustine needs 4+ hours minimum. Use Fine Fescue (cool season) or consider groundcover in deep shade.
- Desert Southwest: Low humidity and extreme heat stress St. Augustine. Bermuda is much better for Arizona, New Mexico, inland California.
How to Establish St. Augustine Grass
St. Augustine grass is typically established by sod or plugs, with seed being less common due to very slow establishment. The biggest trade-off with St. Augustine is the long establishment time (12-24 months from plugs) versus its exceptional long-term performance. Most homeowners choose sod for instant results, despite the higher cost.
Establishment Method Comparison
| Method | Cost (per 1000 sq ft) | Establishment Time | Best Timing | Difficulty | Best Use Case |
|---|---|---|---|---|---|
| Sod | $400-700 | Instant lawn, roots in 2-3 weeks | Late spring to early fall | Easy-Medium | Most common - instant results, erosion control |
| Plugs | $150-350 | 12-24 months to fill in | Late spring to early summer | Easy | Budget option, small areas, requires patience |
| Seed | $100-250 | 90-120 days germination, 18-24 months full | Late spring (soil 70°F+) | Hard | Rarely used - very slow, limited varieties |
| Sprigs | $200-400 | 10-18 months to fill in | Late spring to early summer | Medium-Hard | Large areas, golf courses (not common residential) |
Installing St. Augustine Sod (Most Common Method)
A. Soil Preparation (Same for All Methods)
1. Soil Test: Test pH and nutrient levels 6-8 weeks before installation through your local USDA NRCS soil lab or university extension. St. Augustine prefers pH 6.0-6.5 but tolerates 5.5-7.0.
2. Clear Existing Vegetation: Kill existing grass and weeds with glyphosate (Roundup) 2-3 weeks before installation. Wait for complete brown-out. Remove dead vegetation if thick.
3. Amendments: Add lime to raise pH or sulfur to lower it, based on soil test. St. Augustine tolerates poor soil but thrives in well-draining loam. Add compost (1-2 cubic yards per 1000 sq ft) if soil is heavy clay or pure sand.
4. Grading & Leveling: Use landscape rake to create smooth, level surface with slight slope away from buildings (1-2% grade). Remove rocks, debris, and old roots. St. Augustine's density hides minor imperfections, but major low spots will collect water.
5. Final Preparation: Rake smooth and water 24 hours before sod delivery to settle soil. Soil should be firm but not compacted - you should leave shallow footprints when walking.
B. Sod Installation Process
- Order Fresh Sod: St. Augustine sod costs $0.40-0.70 per sq ft ($400-700 per pallet covering 450-500 sq ft). Order for same-day or next-day installation - don't let sod sit rolled up more than 24 hours.
- Apply Starter Fertilizer: Use 18-24-12 or similar at 1 lb per 1000 sq ft. Rake in lightly before laying sod.
- Start Along Straight Edge: Begin installation along driveway, sidewalk, or string line. Lay first row perfectly straight - all other rows follow this one.
- Brick Pattern: Stagger joints like brickwork. Never line up seams - this causes visible lines and weak spots. Butt edges tightly together with no gaps or overlaps.
- Trim Edges: Use sharp knife or sod cutter for curves, edges, and obstacles. St. Augustine sod is thicker than Bermuda, so use heavy-duty blade.
- Roll Immediately: Use water-filled roller (50% full) over freshly laid sod to eliminate air pockets and ensure root-to-soil contact. This is critical for St. Augustine.
- Water Deeply: Soak immediately after installation to 6 inches depth. Lift corner of sod to verify water penetration to soil below.
- Daily Watering (First 2 Weeks): Water daily (or twice daily in hot weather) to keep soil moist 4-6 inches deep. Sod should never dry out during rooting period.
- Root Check: After 10-14 days, gently tug corner of sod. If it resists pulling up, roots are establishing. Continue daily watering one more week.
- First Mowing: Wait 14-21 days (after roots established). Mow to 2 inches. Ensure blade is sharp. Bag clippings for first 2 mowings.
- Traffic: Avoid heavy traffic for first 3-4 weeks. Light foot traffic OK after 2 weeks. Full use after 6 weeks.
C. Plug Installation (Budget Option)
St. Augustine plugs are 2-4" diameter circles planted on 6-12" centers. Closer spacing fills in faster but costs more. This method requires extreme patience.
- Purchase Plugs: Buy trays of 18-72 plugs. Calculate quantity: 6" spacing = 4 plugs per sq ft, 12" spacing = 1 plug per sq ft. Most choose 8-10" spacing as compromise.
- Plant in Grid: Mark planting locations with spray paint or stakes in grid pattern. Use bulb planter or plug tool to dig holes matching plug depth.
- Plant Plugs: Place plugs in holes flush with soil surface (not raised or sunken). Firm soil around each plug. Water immediately.
- Mulch Between Plugs (Optional): Some apply thin pine straw between plugs to suppress weeds. Remove as St. Augustine spreads.
- Frequent Watering: Water 2-3x per week to keep plugs from drying out. Each plug should stay moist for first month.
- Fertilize Lightly: Apply 0.25-0.5 lb N per 1000 sq ft monthly May-August to encourage spreading. Don't over-fertilize - causes weak growth.
- Weed Control: Hand-pull weeds between plugs for first year. After 4 weeks, can use selective herbicides carefully (spot treat only, avoid spraying plugs directly).
- Patience Required: At 12" spacing, expect 12-18 months for full coverage. At 6" spacing, 8-12 months. This is the main drawback of plug method.
Establishment Cost Breakdown (1000 sq ft)
Sod Installation (Most Common - DIY)
| St. Augustine Sod (2 pallets, delivered) | $400-700 |
| Starter Fertilizer (18-24-12) | $15-25 |
| Soil Amendments (lime/compost if needed) | $30-60 |
| Glyphosate (weed killer for prep) | $10-15 |
| Sod Knife/Blade | $15-30 |
| Roller Rental (1 day) | $30-50 |
| TOTAL DIY (Sod): | $500-880 |
| Professional Installation (labor) | $300-500 |
| TOTAL Professional (Sod): | $800-1,380 |
Plug Installation (Budget DIY)
| St. Augustine Plugs (100-150 plugs at 8-10" spacing) | $120-250 |
| Starter Fertilizer | $15-25 |
| Soil Prep & Amendments | $30-50 |
| Bulb Planter Tool (if don't own) | $15-25 |
| Mulch (optional) | $20-40 |
| TOTAL DIY (Plugs): | $200-390 |
Bottom Line: St. Augustine sod costs 2-3x more than Bermuda sod ($400-700 vs $150-250 per 1000 sq ft) but provides immediate results and superior long-term performance. Plugs save 50-60% on initial cost but take 12-24 months to fill in. Most homeowners choose sod for instant gratification despite higher price. Consider sod a long-term investment - St. Augustine lasts decades with minimal inputs.
Common Mistakes to Avoid
- ❌ Rushing Installation: Soil prep is 80% of success. Don't skip leveling, amendments, or weed killing.
- ❌ Letting Sod Dry Out: #1 cause of failure. St. Augustine has shallow roots for first 2-3 weeks. Daily watering is non-negotiable.
- ❌ Poor Roller Contact: Air pockets under sod cause brown spots. Roll thoroughly after installation.
- ❌ Installing Too Early in Spring: Wait until soil is 70°F+ consistently. Cold soil slows rooting dramatically.
- ❌ Mowing Too Soon: Wait 14-21 days minimum. Premature mowing can dislodge sod before roots establish.
- ❌ Giving Up on Plugs: Plugs look sparse for months. This is normal. Maintain watering and fertilization schedule - they will fill in (eventually).
- ❌ Over-Fertilizing New Sod: Use only starter fertilizer for first 8 weeks. Heavy nitrogen causes fast weak growth and disease susceptibility.
Shade Management: The St. Augustine Advantage
The reality: St. Augustine is the most shade-tolerant warm-season turfgrass. That doesn't mean it grows in full shade. It means it performs better in PARTIAL shade than Bermuda, Zoysia, or Bahia grass.
I've had this conversation countless times: Customer says "I need grass that grows in shade." I ask "How many HOURS of direct sun?" They answer "It's pretty shady" (translation: they haven't actually measured). When we measure, it's usually 5-6 hours of sun—that's partial shade, and St. Augustine will thrive.
Understanding light requirements—actual numbers, not marketing claims—is critical for success.
Defining Shade Levels (Actual Hours)
☀️ Full Sun
Definition: 8+ hours direct sunlight daily
St. Augustine Performance: Excellent (all cultivars)
Growth: Maximum density and vigor
Challenges: Heat stress, chinch bugs, higher water needs
🌤️ Partial Shade (Light Shade)
Definition: 4-8 hours direct sunlight
St. Augustine Performance: Excellent to Good (cultivar-dependent)
Growth: Moderate density, good coverage
Best Use: This is the SWEET SPOT for St. Augustine
⛅ Moderate Shade
Definition: 2-4 hours direct sunlight
St. Augustine Performance: Fair to Poor (only shade-tolerant cultivars)
Growth: Thin coverage, slow establishment
Reality: Challenging even for Palmetto/Amerishade
☁️ Dense/Full Shade
Definition: <2 hours direct sunlight
St. Augustine Performance: Failure (all cultivars)
Growth: Will not survive long-term
Reality: No turfgrass survives this—consider groundcovers instead
How to Measure Light Levels
Method #1: Manual Sun Tracking (Most Accurate)
Best for: Homeowners, free, simple
Procedure:
- Choose a typical summer day (June-August when tree canopy is full)
- Mark your test location
- Check every hour from 7 AM to 7 PM
- Record whether location has direct sun or shade
- Count total hours of direct sunlight
What counts as "direct sun":
- Bright, unobstructed sunlight
- Crisp shadows visible
- Grass illuminated, not in tree shadow
What doesn't count:
- Dappled shade through tree canopy
- Reflected light from buildings
- Bright shade (ambient light but no direct sun)
Example Tracking Sheet:
- 7 AM: Shade
- 8 AM: Sun ✓
- 9 AM: Sun ✓
- 10 AM: Sun ✓
- 11 AM: Shade (tree canopy)
- 12 PM: Shade
- 1 PM: Shade
- 2 PM: Sun ✓
- 3 PM: Sun ✓
- 4 PM - 7 PM: Shade
Total: 5 hours direct sun = Partial Shade ✓ St. Augustine will work
Method #2: Smartphone Apps (Quick Check)
Apps: Sun Seeker, Sun Surveyor, Photometer apps
What they do: Map sun path, estimate hours based on obstructions
Cost: $0-20
Accuracy: Good estimate, not perfect
Best for: Quick assessment before detailed planning
Method #3: Light Meter (Professional)
Equipment: Digital light meter
Thresholds:
- Full sun: 10,000+ foot-candles
- Partial shade: 4,000-8,000 foot-candles
- Moderate shade: 1,000-4,000 foot-candles
- Dense shade: <1,000 foot-candles
Best for: Professional installations, large expensive projects
Minimum Light Requirements by Cultivar
Critical insight: Not all St. Augustine varieties handle shade equally. Choose the RIGHT cultivar for your light levels.
| Cultivar | Minimum Sun Hours | Optimal Sun Hours | Shade Rating |
|---|---|---|---|
| Palmetto | 4-5 hours | 5-7 hours | ⭐⭐⭐⭐⭐ Excellent |
| Amerishade | 4-5 hours | 5-7 hours | ⭐⭐⭐⭐⭐ Excellent |
| Bitterblue | 4-5 hours | 5-7 hours | ⭐⭐⭐⭐⭐ Excellent |
| Captiva | 4-5 hours | 5-8 hours | ⭐⭐⭐⭐ Very Good |
| Raleigh | 5-6 hours | 6-8 hours | ⭐⭐⭐⭐ Very Good |
| Seville | 5-6 hours | 6-8 hours | ⭐⭐⭐ Good |
| Classic | 5-6 hours | 7-9 hours | ⭐⭐⭐ Good |
| Floratam | 6-7 hours | 7-9 hours | ⭐⭐ Fair |
Cultivar Selection by Sun Hours
- 4-5 hours sun: Palmetto, Amerishade, or Bitterblue ONLY
- 5-6 hours sun: Palmetto, Captiva, Raleigh, or Seville
- 6-7 hours sun: Any cultivar will work
- 8+ hours sun (full sun): All cultivars thrive; choose based on other factors (cold tolerance, texture, color)
Management Adjustments for Shade
St. Augustine in shade requires different care than St. Augustine in full sun. These adjustments maximize performance:
1. Mowing Height - TALLER in Shade
Full Sun: 2.5-3 inches
Partial Shade: 3-3.5 inches (add 0.5 inches)
Moderate Shade: 3.5-4 inches (add 1 inch)
Why: Taller grass = more leaf area = more photosynthesis in limited light
Never go below: 3 inches in any shade situation
2. Fertilization - LESS in Shade
Full Sun: 3-4 lbs N per 1,000 sq ft annually
Partial Shade: 2-3 lbs N per 1,000 sq ft annually (reduce 25-33%)
Why: Lower photosynthesis = less carbohydrate production = can't support aggressive growth
Result of over-fertilizing in shade: Weak, spindly growth + disease problems
3. Irrigation - LESS Frequent in Shade
Full Sun: 0.75-1 inch per week
Partial Shade: 0.5-0.75 inch per week (reduce 25%)
Why: Less evapotranspiration in shade = soil stays moist longer
Disease risk: Shade + excess moisture = brown patch and gray leaf spot
Test soil moisture: Only water when top 2 inches of soil is dry
4. Aeration - MORE Important in Shade
Why: Tree roots compete with grass roots for oxygen and nutrients
Frequency: Twice per year in shade (spring and fall) vs once per year in sun
Benefit: Improved air circulation and root development
5. Traffic - MINIMIZE in Shade
Reality: Shaded St. Augustine recovers slowly from traffic damage
Solution: Install stepping stones or pathways in high-traffic shaded areas
Alternative: Use mulch or groundcovers in play areas under trees
6. Fungicide - Be Ready
Shade increases disease pressure: Gray leaf spot and brown patch love shade + moisture
Prevention: Water early morning only, improve air circulation, avoid over-fertilization
Treatment: Have fungicide on hand for quick response
Realistic Expectations for Shade
✅ What You CAN Expect with Proper Care
- Dense, acceptable coverage in 4-6 hours sun
- Moderate growth and spreading
- Good color (lighter green than full sun, but healthy)
- Lawn suitable for light foot traffic
- Lower maintenance than full sun (less mowing, less watering)
⚠️ What You CANNOT Expect
- Golf course density in heavy shade
- Same performance as full sun areas
- Zero bare spots under mature oak trees with <4 hours sun
- Fast recovery from traffic damage
- Success with <4 hours sun (even with Palmetto)
The Shade Tolerance Truth
St. Augustine CAN grow in shade... but it doesn't THRIVE in shade.
"Shade tolerant" means it survives in 4-6 hours sun where Bermuda and Zoysia would fail. It doesn't mean it performs as well in shade as in sun. There's a threshold—around 4 hours minimum—and below that threshold, no amount of perfect management will create a beautiful lawn.
I've seen Palmetto look fantastic in 5 hours of sun with proper care. I've also seen it thin out and die in 3 hours of sun despite perfect management. Respect the limits.
Tree Pruning vs Acceptance
If your lawn gets <4 hours sun, you have three options:
Shade Management Summary
Key Takeaways
- Measure your sun hours accurately—don't guess. Manual tracking is free and accurate.
- 4 hours minimum for St. Augustine success (even shade-tolerant cultivars)
- Choose the right cultivar: Palmetto, Amerishade, or Bitterblue for 4-5 hours; Floratam needs 6-7 hours
- Adjust management: Taller mowing, less fertilizer, less water, more aeration
- Set realistic expectations: Shade-grown St. Augustine won't match full-sun density
- Know when to quit: <4 hours sun = consider groundcovers instead of fighting
Success Formula for Shade
Right Cultivar (Palmetto/Amerishade) + 4-6 Hours Sun + Adjusted Management = Beautiful Shaded Lawn
St. Augustine's shade tolerance is real—it's THE reason to choose St. Augustine over Bermuda or Zoysia. But "shade tolerant" doesn't mean "no light required." Respect the 4-hour minimum, choose the right cultivar, adjust your management, and St. Augustine will create a lush lawn under trees where other warm-season grasses fail.
Cultivar Comparison & Selection Guide
Critical decision: You're not just growing "St. Augustine grass"—you're growing a specific cultivar like Floratam, Palmetto, CitraBlue, or one of a dozen others. These aren't marketing names. They're genetically distinct varieties with measurably different performance that can determine success or failure in your conditions.
I've seen homeowners struggle for years with thin grass in 60% shade, applying more fertilizer and water, convinced they're doing something wrong. The problem wasn't their management—it was Floratam in conditions requiring Palmetto. I've watched lawns devastated by chinch bugs three summers in a row with owners who didn't know resistant cultivars existed.
Cultivar selection is THE most impactful decision you make. Everything else—mowing, fertilizing, watering—is optimization. But if you have the wrong cultivar for your conditions, even perfect management won't create excellent results.
Complete Cultivar Comparison Table
All ratings are on a 1-5 star scale relative to other St. Augustine cultivars. Even a "fair" shade-tolerant St. Augustine outperforms bermudagrass in shade.
| Cultivar | Texture | Color | Shade | Cold | Drought | Salt | Chinch Bugs | Best Use |
|---|---|---|---|---|---|---|---|---|
| Palmetto | Standard (6-7mm) | Dark green | ⭐⭐⭐⭐⭐ | ⭐⭐⭐⭐ | ⭐⭐⭐⭐ | ⭐⭐⭐⭐ | ⭐⭐ | Shade, versatile, coastal, Zone 8-10 |
| Floratam | Coarse (7-8mm) | Dark green | ⭐⭐ | ⭐⭐⭐ | ⭐⭐⭐ | ⭐⭐ | ⭐⭐⭐ | Full sun (6-8+ hrs), budget, fast growth |
| Raleigh | Coarse (6-8mm) | Medium green | ⭐⭐⭐⭐ | ⭐⭐⭐⭐⭐ | ⭐⭐⭐ | ⭐⭐ | ⭐⭐⭐ | Transition Zone (Zone 8), cold climates |
| Captiva | Fine (4-5mm) | Med-dark green | ⭐⭐⭐⭐ | ⭐⭐⭐ | ⭐⭐⭐ | ⭐⭐⭐ | ⭐⭐⭐ | Low maintenance (dwarf), fine texture |
| Seville | Fine (4-5mm) | Blue-green | ⭐⭐⭐⭐ | ⭐ | ⭐⭐ | ⭐⭐⭐ | ⭐⭐ | Warm climates only (9b-10), finest texture |
| Amerishade | Med-fine (5-6mm) | Dark green | ⭐⭐⭐⭐⭐ | ⭐⭐⭐ | ⭐⭐⭐ | ⭐⭐⭐ | ⭐⭐ | Heavy shade (comparable to Palmetto) |
| Bitterblue | Medium (5-7mm) | Blue-green | ⭐⭐⭐⭐⭐ | ⭐⭐⭐ | ⭐⭐⭐ | ⭐⭐⭐ | ⭐⭐ | Shade + blue color preference |
| CitraBlue | Standard (6-7mm) | Blue-green | ⭐⭐⭐ | ⭐⭐⭐ | ⭐⭐⭐ | ⭐⭐⭐ | ⭐⭐⭐ | Full sun, blue color preference |
| Classic | Med-fine (5-6mm) | Medium green | ⭐⭐⭐ | ⭐⭐⭐ | ⭐⭐⭐ | ⭐⭐⭐ | ⭐⭐⭐ | All-around balanced performance |
| Jade | Fine (4-5mm) | Blue-green | ⭐⭐⭐⭐ | ⭐⭐ | ⭐⭐ | ⭐⭐⭐ | ⭐⭐ | Warm climates (Zone 9-10), fine texture |
| DelMar | Fine (4-5mm) | Blue-green | ⭐⭐⭐⭐ | ⭐⭐ | ⭐⭐⭐ | ⭐⭐⭐⭐ | ⭐⭐ | California coastal only |
| ProVista | Fine (4-5mm) | Medium green | ⭐⭐⭐⭐ | ⭐⭐⭐ | ⭐⭐⭐ | ⭐⭐⭐ | ⭐⭐⭐ | Low maintenance (dwarf) |
| Sapphire | Medium (5-6mm) | Blue-green | ⭐⭐⭐ | ⭐⭐⭐ | ⭐⭐⭐ | ⭐⭐⭐ | ⭐⭐⭐ | Blue color, general purpose |
| Common | Coarse (6-8mm) | Med-dark green | ⭐⭐⭐ | ⭐⭐ | ⭐⭐ | ⭐⭐ | ⭐ | ❌ DO NOT PLANT (use improved cultivars) |
How to Choose Your Cultivar: The Primary Limiting Factor Approach
Don't choose based on price or availability alone. Identify your single most severe limiting factor, then choose the cultivar bred to handle that specific challenge.
Step 1: Assess Shade (Highest Priority)
Walk your property at 10 AM, 1 PM, and 4 PM on a clear day. Count hours of direct sun for each area.
IF ANY area receives <6 hours direct sun:
- Shade is your primary limiting factor
- TOP CHOICES: Palmetto, Amerishade, Bitterblue
- AVOID: Floratam (will fail in shade)
- Shade takes priority over all other factors—no management fixes wrong cultivar in shade
IF ALL areas receive 6+ hours direct sun:
- Shade is NOT limiting → Move to Step 2
💡 PRO TIP: When in doubt, choose shade-tolerant cultivar anyway. Palmetto performs excellently in full sun AND shade. Floratam only performs well in full sun. Shade-tolerant cultivars provide insurance as trees mature.
Step 2: Assess Cold Tolerance
Check your USDA Hardiness Zone:
Zone 8a or colder:
- Cold is your primary limiting factor
- TOP CHOICE: Raleigh (ONLY cultivar reliable in Zone 8a)
Zone 8b:
- TOP CHOICES: Raleigh (best cold tolerance), Palmetto (very good cold tolerance)
- AVOID: Seville, Jade (too cold-sensitive)
Zone 9-10:
- Cold is NOT limiting → Move to Step 3
Step 3: Assess Salt Exposure
<500 feet from ocean with direct salt spray:
- Salt is primary limiting factor
- TOP CHOICES: Palmetto, DelMar (California only)
>500 feet from ocean OR inland:
- Salt is NOT limiting → Move to Step 4
Step 4: Aesthetic Priorities
Want FINEST texture (closest to bermudagrass appearance)?
- Warm climates only (Zone 9b-10): Seville (finest available)
- Broader climate range (Zone 8b-10): Captiva or Jade
- Trade-off: Fine texture = slower establishment
Want blue-green color?
- With shade: Bitterblue
- Full sun: CitraBlue, Sapphire
- Warm climates with shade: Seville or Jade
Want reduced mowing (low-maintenance)?
- TOP CHOICES: Captiva, ProVista (dwarf habit = mow every 10-14 days)
- Trade-off: Slower establishment, higher initial cost
Step 5: Default to Versatile All-Around Performers
If you've reached this step without identifying a primary limiting factor:
Best All-Around Choice: Palmetto
- ⭐⭐⭐⭐⭐ Excellent shade tolerance (provides insurance even if you don't have shade now)
- ⭐⭐⭐⭐ Very good cold tolerance (Zone 8-10)
- ⭐⭐⭐⭐ Very good salt tolerance
- ⭐⭐⭐⭐ Good drought tolerance
- Only weakness: chinch bug susceptibility (manageable with monitoring)
- Premium cost (20-40% more than Floratam) justified by versatility
Budget Alternative: Floratam
- Choose ONLY if you have confirmed full sun (6-8+ hours) in ALL areas
- Fastest establishment of common cultivars
- Widely available, lowest cost (baseline pricing)
- Excellent heat tolerance and wear recovery
- CRITICAL: Fails in shade—don't plant in partial shade
Quick Recommendations by Situation
🌳 Heavy Shade (4-6 hours sun)
Best: Palmetto, Amerishade, Bitterblue
Why: Only these have ⭐⭐⭐⭐⭐ shade tolerance
Avoid: Floratam (⭐⭐ - will thin out and fail)
❄️ Transition Zone (Zone 8)
Best: Raleigh
Why: Only ⭐⭐⭐⭐⭐ cold tolerance cultivar
Alternative: Palmetto (very good cold tolerance)
☀️ Full Sun, Budget-Conscious
Best: Floratam
Why: Lowest cost, fastest growth, wide availability
Requirement: Must have 6-8+ hours direct sun
🌊 Coastal (Salt Exposure)
Best: Palmetto
Why: ⭐⭐⭐⭐ salt tolerance + shade tolerance
California: DelMar (bred for coastal)
🏡 Low Maintenance
Best: Captiva, ProVista
Why: Dwarf habit = mow every 10-14 days (vs weekly)
Trade-off: Slower establishment, higher cost
🎨 Fine Texture Priority
Warm climates (9b-10): Seville (finest 4-5mm)
Zone 8b-10: Captiva or Jade
Avoid: Cold-sensitive in Zone 8
🌐 Versatile All-Around
Best: Palmetto
Why: Excels in shade, cold, salt, drought
Alternative: Classic (balanced, mid-tier pricing)
🐛 Chinch Bug History
Best: Floratam (⭐⭐⭐ resistance)
Reality: ALL cultivars need monitoring
Strategy: Prevention + float test monitoring
Common Cultivar Selection Mistakes to Avoid
❌ Mistake #1: Choosing Based on Price Alone
The scenario: "Floratam is $200 cheaper than Palmetto for my 1,000 sq ft, so I'll save money with Floratam."
The problem: If you have shade, Floratam will fail. You'll spend 2-3 years struggling, then pay for renovation with Palmetto anyway—costing far more than the initial $200 savings.
The fix: Choose based on conditions FIRST, then consider cost within suitable cultivars.
❌ Mistake #2: Planting Cold-Sensitive Cultivars in Transition Zone
The scenario: "I love Seville's fine texture, so I'll plant it in Zone 8b."
The problem: Seville is rated ⭐ for cold tolerance (Zone 9b-10 only). It will be damaged or killed in first hard freeze.
The fix: Respect zone ratings. Use Captiva (similar fine texture, ⭐⭐⭐ cold tolerance) in Zone 8.
❌ Mistake #3: Ignoring Future Shade
The scenario: "I have full sun now, so Floratam is perfect."
The problem: Young trees mature. In 5-10 years, you have partial shade. Floratam thins out. You need renovation.
The fix: Choose shade-tolerant cultivar (Palmetto) for insurance. It performs great in full sun too.
❌ Mistake #4: Not Asking Sod Farm for Specific Cultivar
The scenario: "I ordered 'St. Augustine sod' without specifying cultivar."
The problem: You might get Common St. Augustine (⭐ ratings across the board) or whatever they have in stock.
The fix: ALWAYS specify cultivar when ordering: "I want Palmetto St. Augustine, not Floratam or Common."
Your Cultivar Selection Action Plan
- Measure sun exposure at 10 AM, 1 PM, 4 PM on clear day. Count hours of direct sun.
- Confirm your USDA zone at usda.gov/plant-hardiness-zones
- Identify your primary limiting factor: Shade? Cold? Salt? Or versatile all-around?
- Match cultivar to limitation:
- Shade → Palmetto/Amerishade
- Cold (Zone 8) → Raleigh
- Full sun budget → Floratam (6-8+ hrs sun required)
- Versatile/unsure → Palmetto
- Verify availability with 2-3 local sod farms. Ask about specific cultivar availability and cost.
- Order by name: "I want [specific cultivar] St. Augustine sod" - don't accept generic "St. Augustine"
Bottom line: Cultivar selection determines 60-70% of your St. Augustine lawn success. Management (mowing, fertilization, irrigation) determines the other 30-40%. Get the cultivar right first.
Mowing Science for St. Augustine
Mowing is the single most frequent lawn care task you'll perform. Once per week during growing season, 30-40 times per year, for 20+ years of lawn ownership = 600-800 mowings.
Get it right and your St. Augustine thrives. Get it wrong and you'll fight problems constantly.
I've diagnosed hundreds of lawn problems that traced back to improper mowing: scalping, dull blades, wrong height, incorrect frequency. Fix the mowing and half the problems disappear.
Optimal Mowing Heights
St. Augustine is NOT a low-cut grass. It evolved in coastal environments with minimal grazing pressure. The plant anatomy isn't designed for golf course heights.
| Cultivar Type | Optimal Height | Acceptable Range | Never Below |
|---|---|---|---|
| Common/Standard Types (Floratam, Palmetto, Raleigh, Classic) | 3-3.5 inches | 2.5-4 inches | 2 inches |
| Dwarf Types (Seville, DelMar, Jade) | 2.5-3 inches | 2-3.5 inches | 1.5 inches |
| Shade Areas | Add 0.5-1 inch to above heights | ||
Why These Heights?
✅ At 3-3.5 inches (Optimal):
- Grass shades soil surface (cooler microclimate, less weed germination)
- Deeper root system (better drought tolerance)
- More leaf surface area (more photosynthesis)
- Dense canopy (crowds out weeds)
- Better disease resistance
❌ Below 2 inches (Scalped):
- Grass is stressed and thin
- Weeds invade easily
- Chinch bugs and disease worse
- Poor heat/drought tolerance
- Lawn looks terrible
💡 PRO TIP: Most homeowners mow St. Augustine too short because they're used to bermudagrass or because they want a "golf course look." St. Augustine cut at 2 inches looks thin, weedy, and stressed. The same lawn at 3.5 inches looks lush and healthy. Raise your mower deck.
The 1/3 Rule (Critical)
Never remove more than 1/3 of the grass blade height in a single mowing.
Examples:
- ✅ Good: Grass at 4.5 inches, mowing to 3 inches = Removing 1.5" (exactly 1/3)
- ❌ Too much: Grass at 5 inches, mowing to 3 inches = Removing 2" (40%)
- ❌ Severe stress: Grass at 6 inches, mowing to 3 inches = Removing 3" (50%)
Why the 1/3 Rule Matters:
Photosynthesis:
Grass blade has chlorophyll throughout its length. Removing >1/3 removes too much photosynthetic capacity. Grass goes into shock, growth slows.
Carbohydrate Reserves:
Grass stores energy in stolons and roots. When >1/3 removed, grass must use stored energy to regrow. Repeated violations deplete energy reserves.
Stress Response:
Heavy cuts trigger stress response. Grass prioritizes survival over growth. Makes grass vulnerable to disease, pests, weeds.
Mowing Frequency
Growing Season (May-September)
Frequency: Weekly (7-10 days maximum)
Why: St. Augustine grows 1-2 inches per week in summer. Keeping within 1/3 rule requires weekly cuts.
Shoulder Seasons (April, October)
Frequency: Every 10-14 days
Why: Growth slower in cooler temps
Dormant Season (November-March in most areas)
Frequency: As needed (every 3-4 weeks or not at all)
Why: Little to no growth during dormancy
Special Conditions:
- After Rain/Fertilization: Growth accelerates after nitrogen application or heavy rain. May need to mow twice per week temporarily.
- During Drought: Growth slows dramatically. May stretch to 14 days between mowings. Don't mow drought-stressed grass if avoidable.
Blade Sharpness - Critical
Dull mower blades are a disaster for St. Augustine.
Dull Blade "Cut":
- Tears and shreds grass blade
- Jagged wound (turns white/tan, visible damage)
- Wound takes 5-7 days to heal
- Easy disease entry point
- Grass blade moisture loss
Visual Test:
- Walk behind mower after cutting
- Look at grass tips
- Brown/white shredded tips = dull blade
- Clean green tips = sharp blade
Mowing Pattern and Technique
Vary Pattern Weekly:
- Week 1: North-South
- Week 2: East-West
- Week 3: Diagonal NE-SW
- Week 4: Diagonal NW-SE
Why Vary:
- Prevents soil compaction in wheel tracks
- Prevents grass grain (all blades leaning one direction)
- More even cut
Overlap Passes:
Overlap by 3-4 inches each pass. Prevents missed strips and ensures complete coverage.
Turn Technique:
Make wide turns (avoid tight pivots on turf). Turn on hard surfaces when possible. Reduces turf wear and compaction.
Wet Grass:
Best practice: Don't mow wet grass
- Wet grass clumps, mower clogs, uneven cut
- Disease spread increases (mower transfers spores)
- Wait until grass dries (usually by 10 AM after dew)
Clipping Management: Bag or Mulch?
Mulching (Leave Clippings)
Pros:
- Returns nitrogen to soil (clippings = 25% of lawn's N needs)
- Saves time (no bagging/disposal)
- Free fertilizer
Cons:
- Can contribute to thatch buildup (minor concern)
- Clumps visible if grass too long or wet
- May spread disease during outbreaks
Best for: Regular weekly mowing, dry grass, no active disease
Bagging (Remove Clippings)
Pros:
- Cleaner appearance
- Removes disease spores during outbreaks
- Reduces thatch accumulation slightly
Cons:
- Removes nutrients (must fertilize more)
- Extra time and labor
- Disposal challenges
Best for: Catching up after missing a mowing, active disease present, excessive thatch concern
My recommendation:
- Mulch 90% of the time (return nutrients, save time)
- Bag during disease outbreaks (brown patch, gray leaf spot)
- Bag if you've let grass get too long (>5 inches)
Common Mowing Mistakes
Mistake #1: Scalping
What it is: Cutting grass too short, exposing stolons and soil
Causes:
- Mower set too low
- Uneven ground (high spots get scalped)
- Mowing after skipping 2+ weeks
Consequences:
- Brown patches where scalped
- Stress and thinning
- Weed invasion
- Disease/pest vulnerability
Fix:
- Raise mower deck to 3-3.5"
- Level low spots in lawn
- Mow more frequently (don't let grass get too tall)
Mistake #2: Mowing Same Pattern Every Week
What it is: Always mowing in same direction
Consequences: Soil compaction in wheel tracks, grass develops grain (leans one direction), uneven wear patterns
Fix: Rotate pattern weekly (North-South, East-West, Diagonal)
Mistake #3: Mowing Too Infrequently
What it is: Letting grass get 5-6+ inches, then cutting to 3"
Consequences:
- Violates 1/3 rule (stress)
- Heavy clippings smother grass
- Depletes carbohydrate reserves
- Makes grass thin and weak
Fix: Mow weekly during growing season
Mistake #4: Dull Blades
Covered above - Sharpen 3-4x per season minimum
Mistake #5: Wrong Mower Type
Rotary mower (most common):
- ✅ Good for St. Augustine
- Adequate cut quality, affordable
- Most homeowners use these
Reel mower:
- ❌ Poor for St. Augustine
- Designed for low-cut grasses (bermuda, bentgrass)
- St. Augustine stolons jam reel mechanism
- Don't use unless specifically designed for St. Augustine
Riding mower:
- ✅ Fine for large lawns
- Watch for compaction on wet soil
- Zero-turn can damage turf if used improperly (tight turns)
The Mowing Bottom Line
Perfect St. Augustine mowing:
- Height: 3-3.5 inches (standard types), 2.5-3" (dwarf types)
- Frequency: Weekly during growing season
- 1/3 rule: Never remove more than 1/3 of blade height
- Sharp blades: Sharpen 3-4x per season
- Vary pattern: Change direction each week
- Dry grass: Wait until morning dew dries
Do these six things consistently and you'll have the best-looking St. Augustine in your neighborhood - guaranteed.
Ignore any one of them and you'll struggle with problems.
Fertilization & Nutrition Management
St. Augustine fertilization is a balancing act:
- Too little nitrogen = thin weak turf, weeds invade, poor color
- Too much nitrogen = disease problems, excessive growth, environmental damage
The goal is finding the sweet spot: enough nutrition for healthy dense growth, not so much that you create problems.
Annual Nitrogen Requirements
| Level | Annual N Rate | Result |
|---|---|---|
| Minimum | 2 lbs N per 1,000 sq ft per year | Survival level - thin turf |
| Optimal | 3-4 lbs N per 1,000 sq ft per year | Healthy dense turf |
| Maximum | 5-6 lbs N per 1,000 sq ft per year | High maintenance, disease risk |
Most St. Augustine lawns: 3-4 lbs N per year in 4-6 split applications
Example Annual Program (4 lbs total N):
| Application | Timing | Rate |
|---|---|---|
| Application 1 | April (spring green-up) | 0.75 lb N per 1,000 sq ft |
| Application 2 | June (early summer) | 0.75 lb N |
| Application 3 | August (late summer) | 1.0 lb N |
| Application 4 | October (fall) | 1.5 lb N |
| Total Annual Nitrogen | 4.0 lbs N per 1,000 sq ft | |
N-P-K Ratios for St. Augustine
Nitrogen (N) - Primary Nutrient
- Drives growth and green color
- Most important element for St. Augustine
- Needs regular replenishment (leaches from sandy soils)
Phosphorus (P) - Secondary
- Root development
- Most soils have adequate P
- Only needed at establishment or if soil test shows deficiency
- Environmental concern (runoff into waterways)
Potassium (K) - Secondary
- Stress tolerance, disease resistance
- Moderately important for St. Augustine
- Include in balanced programs
Recommended Fertilizer Ratios:
💡 PRO TIP: Check your soil test before buying fertilizer with phosphorus. Most established St. Augustine lawns don't need P applications - it's expensive and can cause environmental problems if it runs off into waterways.
Application Timing & Seasonal Rates
Spring Green-Up (April)
Timing: When grass breaks dormancy and starts greening
Rate: 0.5-0.75 lb N per 1,000 sq ft
Purpose: Kickstart growth after winter
⚠️ Caution: Don't apply too early (before soil temps reach 65°F)
Early Summer (June)
Timing: Peak growing season
Rate: 0.5-0.75 lb N
Purpose: Support active growth
⚠️ Caution: Moderate rate to avoid gray leaf spot
Late Summer (August)
Timing: Still actively growing
Rate: 0.75-1.0 lb N
Purpose: Maintain growth through late season
Fall (September-October)
Timing: As temps cool to 70-80°F
Rate: 1.0-1.5 lb N
Purpose: Build carbohydrate reserves for winter, promote fall color
✅ Best timing: Often the most beneficial application
Winter (November-March)
❌ Don't fertilize dormant grass (waste of money, environmental harm)
Exception: South Florida/Texas where St. Augustine stays semi-active
Slow-Release vs Quick-Release Nitrogen
Quick-Release (Water-Soluble) Nitrogen
Forms: Ammonium nitrate, urea
Release: Available immediately, 2-4 weeks duration
Greening: Fast (3-5 days)
Cost: Usually cheaper
Pros:
- Rapid response
- Good for quick green-up
Cons:
- Burn risk if over-applied
- Short duration (need more frequent applications)
- Leaches quickly in sandy soils
- Promotes lush succulent growth (disease-prone)
Slow-Release (Controlled-Release) Nitrogen
Forms: Sulfur-coated urea, polymer-coated urea, IBDU, methylene urea
Release: Gradual over 6-12 weeks
Greening: Slower (7-10 days)
Cost: More expensive
Pros:
- Even sustained feeding
- Low burn risk
- Less frequent application needed
- Environmentally friendly (less leaching)
- Promotes steady growth (not lush/disease-prone)
Cons:
- Higher cost
- Slower response
Recommended Approach:
Micronutrient Management
Iron (Fe) - Critical for St. Augustine
Why Iron Matters:
- Produces deep green color without excessive growth
- Alkaline soils (pH >7.0) often have iron deficiency
- Chlorotic (yellow) grass despite adequate nitrogen
Iron Sources:
- Chelated iron: Best choice, remains available in alkaline soils
- Ferrous sulfate: Cheaper, less effective in high pH
- Iron in fertilizer blends: Convenient
Application:
- Rate: 1-2 oz iron (Fe) per 1,000 sq ft
- Frequency: Monthly during growing season if deficiency present
- Form: Liquid or granular chelated iron
Response:
- Deep green color in 3-7 days
- Doesn't promote excessive growth (unlike nitrogen)
- Cosmetic improvement, not true fertilization
Other Micronutrients:
Magnesium (Mg): Rarely deficient in most soils. Component of chlorophyll. Apply if soil test shows deficiency.
Manganese (Mn): Can be deficient in high pH soils. Causes interveinal chlorosis (green veins, yellow between). Rare in St. Augustine.
Organic vs Synthetic Fertilizers
Synthetic (Chemical) Fertilizers
Examples: Urea, ammonium sulfate, complete blends (16-4-8, etc.)
Pros:
- Precise N-P-K ratios
- Predictable results
- Fast acting
- Less expensive per pound of N
Cons:
- Can burn if misapplied
- Doesn't improve soil biology
- More environmental concerns
Organic Fertilizers
Examples: Milorganite, composted manure, blood meal, feather meal
Pros:
- Slow natural release
- Improves soil biology
- Very low burn risk
- Environmentally friendly
Cons:
- Lower N content (need more product)
- Variable N-P-K ratios
- More expensive per pound of N
- Slower response
Milorganite (Popular Organic Option — check price →)
- N-P-K: 6-4-0
- 100% organic, slow-release
- 4% iron (bonus for St. Augustine)
- Cost: ~$15 per 36 lb bag (covers 2,500 sq ft at 1 lb N)
Product Amount Comparison (to supply 1 lb N per 1,000 sq ft):
Synthetic 21-0-0: 4.8 lbs product
Milorganite 6-4-0: 17 lbs product
My recommendation:
- Synthetic slow-release for efficiency and cost
- Organic if willing to pay premium for environmental benefits
- Either works fine for St. Augustine
Application Techniques
Application Methods:
Broadcast Spreader: Most common method, even coverage, set spreader to manufacturer's rate
Drop Spreader: More precise, good for small areas, requires overlapping passes
Liquid Application: Fast absorption, good for iron applications, requires spray equipment
Application Tips:
1. Calibrate Spreader:
- Set rate based on product label
- Test on driveway first
- Adjust until applying correct amount
2. Apply in Two Directions:
- Apply half rate North-South
- Apply half rate East-West
- Ensures even coverage
3. Water In (Critical):
- Irrigate with 0.25-0.5" water after application
- Moves fertilizer into root zone
- Prevents burn on leaf blades
4. Avoid Hot Weather:
- Don't apply when temps >90°F
- Don't apply to drought-stressed grass
- Don't apply before heavy rain (runoff waste)
Common Fertilization Mistakes
Mistake #1: Too Much Nitrogen
Creates lush growth = disease magnet. Wastes money. Environmental harm.
Fix: Stick to 3-4 lbs N per year maximum
Mistake #2: Wrong Timing
Fertilizing dormant grass (winter) or heavy spring applications during brown patch season
Fix: Follow seasonal timing: April, June, August, October
Mistake #3: Not Watering In
Fertilizer sits on leaf blades, burns grass in sun, product wasted
Fix: Irrigate 0.25-0.5" immediately after application
Mistake #4: Applying to Wet Grass
Granules stick to wet blades, causes burning
Fix: Apply to dry grass, then water in
The Fertility Bottom Line
Successful St. Augustine fertilization:
- Annual total: 3-4 lbs N per 1,000 sq ft
- Split applications: 4-6 times per year, 0.5-1 lb N each
- Timing: April, June, August, October (adjust for your climate)
- Type: 50-100% slow-release nitrogen
- Ratio: 3-1-2 or 4-1-2 (16-4-8, 21-7-14, etc.)
- Iron: Monthly if needed for color (doesn't replace nitrogen)
- Water in: 0.25-0.5" irrigation after every application
Follow this program and your St. Augustine will be healthy, dense, and dark green without excessive disease problems.
Irrigation Management for St. Augustine
St. Augustine evolved in humid coastal environments with regular rainfall, high water tables, and well-drained sandy soils.
Modern lawns in the same climates face a paradox:
- Natural rainfall is often adequate (40-60 inches per year)
- But distribution is uneven (drought periods common)
- Supplemental irrigation needed for consistent quality
The challenge: Provide adequate water without creating disease and pest problems from over-watering.
St. Augustine Water Requirements
| Season/Condition | Water Needed |
|---|---|
| General (growing season) | 0.75-1 inch per week total (rain + irrigation) |
| Summer peak | 1-1.5 inches per week |
| Cooler weather (spring/fall) | 0.5 inches per week |
| Dormancy (winter) | Minimal (0-0.5 inches per month) |
Factors Affecting Water Requirements:
Sun Exposure:
- Full sun: 1-1.25" per week
- Partial shade: 0.75-1" per week
- Heavy shade: 0.5-0.75" per week
Soil Type:
- Sandy soil: More frequent, less duration (drains fast)
- Clay soil: Less frequent, longer duration (drains slow)
Grass Maturity:
- Newly installed: More frequent, shallow
- Established: Less frequent, deeper
Deep Infrequent Watering (The Golden Rule)
The principle: Water deeply (6-8 inches penetration) but infrequently (2-3x per week).
Why Deep Infrequent is Better Than Shallow Frequent:
Root Development:
- Deep watering = roots chase moisture down → deep roots
- Shallow watering = roots stay shallow → poor drought tolerance
- Deep roots = better drought tolerance and healthier grass
Disease Prevention:
- Infrequent = soil surface dries between irrigations
- Dry surface = less favorable for fungal diseases
- Frequent shallow irrigation = constantly moist surface = disease problems
Chinch Bug Resistance:
- Chinch bugs prefer dry stressed grass
- Consistent deep watering reduces chinch bug pressure
- But over-watering creates disease problems
How to Water Deeply:
Duration per Irrigation:
- Spray heads: 30-45 minutes per zone
- Rotors: 60-90 minutes per zone
- Goal: 0.75-1 inch per application
Test Your System (Tuna Can Test):
- Place tuna cans (or similar shallow containers) around zone
- Run system for set time (e.g., 30 minutes)
- Measure water depth in cans
- Calculate how long needed for 0.75-1 inch
Frequency:
- General: 2x per week (every 3-4 days)
- Sandy soil: 3x per week
- Clay soil: 1-2x per week
- Adjust: Based on rainfall and grass appearance
Irrigation Timing (Critical for Disease Prevention)
💡 PRO TIP: If your irrigation timer is set for evening watering, changing it to early morning (4-6 AM) will reduce your disease problems by 50-70%. This single change is worth more than any fungicide program.
Scheduling & Adjustments
Base Schedule (No Rain):
- Monday: Water 0.75-1"
- Thursday: Water 0.75-1"
- Total: 1.5-2" per week
After Rainfall:
- Measure rain with rain gauge
- Skip irrigation if received 0.5"+ rain
- Resume schedule after 3-4 days dry
Smart Controllers (Recommended):
- Weather-based irrigation controllers
- Adjust automatically based on rainfall, temp, humidity
- Can save 20-40% water vs fixed schedules
- Worth investment ($150-300 for controller)
Seasonal Adjustments:
Summer (June-August):
- Increase to 3x per week if needed
- Hot spots may need supplemental hand watering
- Monitor grass for drought stress
Spring/Fall:
- Reduce to 1-2x per week
- Cooler temps = less evapotranspiration
- More rainfall typically
Winter:
- Minimal irrigation (grass dormant)
- 1x every 2-3 weeks if no rain
- Prevent complete desiccation only
Drought Management
Drought Stress Symptoms:
- Grass turns blue-gray color
- Leaf blades fold/roll inward
- Footprints remain visible (grass doesn't spring back)
- Wilted appearance in afternoon
Emergency Irrigation:
- Water immediately with 1 inch
- Within 24-48 hours grass should recover
- Resume regular schedule
Prolonged Drought:
- Increase frequency to 3-4x per week temporarily
- Focus water on priority areas (front yard, high-value areas)
- Accept some thinning in low-priority areas
Drought Hardening:
Gradual reduction in irrigation to encourage deeper root growth and make grass more drought-tolerant.
⚠️ Not recommended for St. Augustine (unlike bermudagrass) - St. Augustine has moderate drought tolerance and doesn't respond well to drought hardening.
System Design Considerations
Coverage:
- Head-to-head spacing: Spray reaches from one head to the next
- Uniform distribution: Tuna can test should show similar depths
- Avoid dry spots: Adjust heads to eliminate gaps
Pressure:
- Proper PSI: 30-40 PSI for spray heads, 40-60 PSI for rotors
- Too high: Misting, poor coverage
- Too low: Short throw, dry spots
Zones:
- Separate zones for sun vs shade (different water needs)
- Separate zones for grass vs beds/trees
- Maximize efficiency with similar water needs per zone
Maintenance:
- Clean clogged heads monthly
- Adjust heads seasonally (growth changes spray pattern)
- Replace broken heads promptly
- Winterize system in freezing climates
The Irrigation Bottom Line
Optimal St. Augustine irrigation:
- Amount: 0.75-1 inch per application
- Frequency: 2x per week (adjust for rain and season)
- Timing: Early morning (4-7 AM)
- Method: Deep infrequent watering
- Monitoring: Rain gauge + visual grass inspection
- Adjustment: Skip after rain, increase during drought
This approach provides adequate water for healthy growth while minimizing disease and pest problems.
⚠️ Over-watering St. Augustine causes more problems than under-watering. When in doubt, water less frequently.
Core Cultural Practices: Dethatching, Aeration & Top-Dressing
Beyond the big three (mowing, fertilization, irrigation), St. Augustine needs periodic maintenance to address thatch, compaction, and soil health.
These practices aren't weekly or monthly - they're annual or every-few-years tasks. But they're critical for long-term lawn health.
Understanding Thatch
What is Thatch?
- Layer of dead/living organic matter between grass blades and soil surface
- Composed of stolons, roots, dead leaves, clippings
- Normal component of St. Augustine lawns
How to Measure Thatch:
- Use soil probe or screwdriver
- Push into turf until hitting soil
- Pull out and examine
- Spongy brown layer above soil = thatch
| Thatch Depth | Status | Action Needed |
|---|---|---|
| <0.5 inches | Beneficial | Provides cushioning and insulation - no action needed |
| 0.5-0.75 inches | Acceptable | Monitor - consider aeration |
| 0.75-1 inch | Problem | Begin reduction program (aeration + top-dressing) |
| >1 inch | Severe | Immediate action - verticutting needed |
Problems from Excessive Thatch:
- Chinch bug habitat: Thatch provides perfect environment for chinch bugs
- Disease harbor: Pathogens survive in thatch layer
- Water/fertilizer barrier: Prevents penetration to roots
- Scalping: Mower rides on thatch, cuts into stolons
- Poor rooting: Roots stay in thatch instead of penetrating soil
Verticutting (Dethatching)
What is Verticutting?
- Machine with vertical blades cuts through thatch
- Blades penetrate 1-2 inches into turf
- Pulls up thatch and debris
When to Verticut:
- Best time: May or early June (active growth period)
- Frequency: Every 2-3 years if thatch >0.75 inches
- NOT during: Summer heat, drought, or dormancy
Verticutting Procedure:
Preparation:
- Mow lawn to 2-2.5 inches (lower than normal)
- Mark sprinkler heads and shallow utilities
- Rent vertical mower (verticutter/dethatcher)
Execution:
- Make first pass in one direction (N-S)
- Make second pass perpendicular (E-W)
- Aggressive setting: blades should penetrate thatch layer
- Lawn will look terrible (lots of pulled-up debris)
Cleanup:
- Rake up debris (or use bagging mower)
- Remove ALL debris from lawn (don't leave it)
- May fill multiple trash bags/yard waste containers
Recovery:
- Fertilize lightly (0.5 lb N per 1,000 sq ft)
- Irrigate heavily (1 inch immediately)
- Resume normal watering schedule
- Expect 2-3 weeks ugly appearance
- Full recovery in 4-6 weeks
Results:
- Removes 40-60% of thatch in single treatment
- Lawn looks thin and brown initially
- Regrows thick and healthy
- Chinch bug pressure drops dramatically
Cost:
Rent verticutter: $75-100 per day
Professional service: $150-300 for 5,000 sq ft
Worth it: Absolutely, if thatch >0.75 inches
💡 PRO TIP: Verticutting is traumatic for grass. Only do it during peak growing season (May-June) when grass can recover quickly. Never verticut in July-August (too hot) or winter (dormant).
Core Aeration
What is Core Aeration?
- Machine pulls plugs of soil/thatch from lawn
- Creates holes 2-3 inches deep, 0.5-0.75 inches diameter
- Leaves soil cores on surface
Why Aerate?
Relieves Soil Compaction:
- Foot traffic, mower, equipment compress soil
- Compacted soil = poor water/air infiltration
- Aeration breaks up compaction
Improves Thatch Decomposition:
- Brings soil microbes to surface
- Increases biological activity in thatch
- Long-term thatch reduction
Enhances Root Growth:
- Roots grow into aeration holes
- Better water/nutrient absorption
When to Aerate:
- Best time: May-June (active growth)
- Frequency: Annually for high-traffic lawns, every 2-3 years for low-traffic
- NOT during: Summer heat, drought, or dormancy
Aeration Procedure:
Preparation:
- Irrigate day before (moist soil, not wet)
- Mark sprinkler heads and utilities
- Rent core aerator or hire service
Execution:
- Make 2-3 passes in different directions
- Overlap slightly for complete coverage
- Goal: 20-40 holes per square foot
Post-Aeration Options:
- Option A: Leave cores on surface to decompose (nutrients return to soil)
- Option B: Rake/mow cores to break them up
- Option C: Remove cores if aesthetics critical
- Top-dress with compost (optional, beneficial)
- Fertilize lightly
- Irrigate normally
Results:
- Immediate improvement in water infiltration
- Gradual thatch reduction (10-20% per year)
- Better root growth
- Less dramatic than verticutting (no ugly phase)
Cost:
Rent aerator: $60-90 per day
Professional service: $100-200 for 5,000 sq ft
| Factor | Aeration | Verticutting |
|---|---|---|
| Thatch removal | Gradual (10-20%/yr) | Immediate (40-60%) |
| Trauma | Minimal | Severe |
| Recovery time | 1-2 weeks | 4-6 weeks |
| Compaction relief | Excellent | None |
| Frequency | Annual | Every 2-3 years |
Recommendation: Core aerate annually, verticut only when thatch >0.75 inches.
Top-Dressing
What is Top-Dressing?
- Spreading thin layer of material over lawn surface
- Material: compost, sand, soil mix
- Layer: 0.25-0.5 inches thick
Benefits:
Thatch Dilution:
- Fills in thatch layer
- Accelerates decomposition
- Gradual thatch reduction
Soil Improvement:
- Adds organic matter
- Improves soil structure
- Increases beneficial microbes
Smoothing:
- Fills low spots
- Levels uneven areas
- Improves surface quality
When to Top-Dress:
- Best time: After aeration (May-June)
- Frequency: Annually or every 2 years
- NOT during: Dormancy or heat stress
Top-Dressing Materials:
Compost (Best Overall Choice):
- High organic matter
- Adds nutrients and microbes
- Cost: $30-50 per cubic yard
Sand:
- Improves drainage in clay soils
- Helps smooth surface
- Little nutrient value
- Cost: $20-40 per cubic yard
Compost/Sand Mix (70/30):
- Combines benefits
- Good for most situations
Avoid:
- Topsoil alone (can create layering)
- Manure alone (too hot, burns grass)
- Materials with weed seeds
Application:
Amount Needed:
- 0.25 inch layer = 0.75 cubic yards per 1,000 sq ft
- 0.5 inch layer = 1.5 cubic yards per 1,000 sq ft
Method:
- Spread material evenly (wheelbarrow + shovel, or spreader for large areas)
- Use backside of rake to work into thatch
- Brush material down to soil level (grass blades should poke through)
- Irrigate lightly to settle
Cost:
Material: $25-75 per 1,000 sq ft
Professional application: $100-200 per 1,000 sq ft
Results:
- Immediate: Lawn looks messy for 1-2 weeks
- Short-term: Grass grows through material, looks normal in 3-4 weeks
- Long-term: Improved soil health, gradual thatch reduction
Annual Maintenance Calendar
May-June (Prime Window):
- ☐ Measure thatch depth
- ☐ Core aerate (all lawns)
- ☐ Verticut IF thatch >0.75 inches
- ☐ Top-dress with compost (optional but beneficial)
- ☐ Fertilize lightly after intensive practices
- ☐ Irrigate heavily to support recovery
Why May-June?
- Peak growing season
- Grass recovers quickly from trauma
- Warm soil temperature (biological activity high)
- Before summer heat stress
Avoid:
- July-August (too hot, recovery slow)
- September-November (brown patch season)
- December-March (dormant, no growth)
The Cultural Practices Bottom Line
Annual Program for Healthy St. Augustine:
Every Year:
- Core aerate in May-June
- Top-dress with 0.25-0.5" compost (optional but recommended)
- Monitor thatch depth in March-April
- Plan spring renovation if needed
Every 2-3 Years:
- Verticut if thatch exceeds 0.75 inches
Cost Analysis:
DIY Cost per Year:
- Aeration rental: $75
- Top-dressing material: $50-100
- Verticutting rental (if needed): $100
- Total: $125-275 per year
Professional Cost per Year:
- Aeration service: $150-250
- Top-dressing service: $200-400
- Verticutting service (if needed): $250-400
- Total: $350-1,050 per year
These investments in soil health and thatch management pay dividends in reduced pest/disease pressure, better drought tolerance, and overall lawn quality.
⚠️ Skip them and you'll fight thatch, compaction, chinch bugs, and disease problems constantly.
St. Augustine Grass Maintenance Calendar
This month-by-month calendar provides a complete care schedule for St. Augustine grass. Timing is adjusted for zones 7-8 (transition zone). Southern zones (9-11) should start tasks 3-4 weeks earlier; northern zone 6 should start 2-3 weeks later. St. Augustine's lower maintenance needs mean fewer fertilizer applications and less frequent mowing compared to Bermuda.
January - Full Dormancy
Primary Task: Rest Period & Planning
🌱 Grass Status: Fully dormant, tan/brown color. St. Augustine dormancy is longer than Bermuda but shorter than most warm-season grasses.
✂️ Mowing: None. Grass is dormant.
💧 Watering: None needed.
🌿 Fertilization: None. Never fertilize during dormancy.
🔧 Other Tasks:
- Service mower, sharpen blades (St. Augustine's tough blades require sharp blade)
- Plan spring lawn projects
- Review last year's fertilization log - St. Augustine needs minimal inputs
- Stay off dormant grass when frozen
Zone 9-11: May stay partially green in warmest areas.
February - Late Dormancy
Primary Task: Prepare for Slow Spring Green-Up
🌱 Grass Status: Still dormant. St. Augustine breaks dormancy later than Bermuda (needs warmer soil temps).
✂️ Mowing: None.
💧 Watering: None unless extremely dry (then 0.25-0.5" per month).
🌿 Fertilization: None. Wait until green-up begins.
🔧 Other Tasks:
- Soil test (if not done in fall) - St. Augustine tolerates wider pH range than most grasses
- Clear debris and leaves from lawn
- Edge beds to prevent St. Augustine creeping into landscaping
- Buy pre-emergent herbicide for late March/early April
Zone 9-11: Apply pre-emergent late February. Green-up may start.
March - Very Early Green-Up
Primary Task: Monitor for Green-Up Signs
🌱 Grass Status: Mostly dormant. Green-up begins late March only if soil consistently 65°F+ (St. Augustine needs warmer temps than Bermuda).
✂️ Mowing: None for most zones. Wait until grass actively growing.
💧 Watering: 0.25-0.5" per week if no rain. St. Augustine doesn't need much water during green-up.
🌿 Fertilization: None yet. Wait until 50% green (usually April). Applying too early wastes fertilizer and feeds weeds.
🔧 Other Tasks:
- Rake out dead material and leaves
- Dethatch if thatch >0.5" (St. Augustine builds thatch faster than Bermuda)
- Fill low spots with topsoil before active growth
- Wait on pre-emergent until late March/early April (soil 55°F for 3 days)
Zone 7: Green-up not until late April. Zone 9-11: Full green by late March.
April - Active Green-Up Begins
Primary Task: Pre-Emergent & First Fertilization
🌱 Grass Status: Breaking dormancy. 30-60% green by late April (zones 7-8). Slower green-up than Bermuda.
✂️ Mowing: Begin when grass reaches 2.5-3" height. Cut to 2". St. Augustine doesn't need frequent mowing yet.
💧 Watering: 0.5-1" per week. Supplement rainfall. St. Augustine's deep roots tolerate some dryness.
🌿 Fertilization:
- Pre-emergent: Apply when soil reaches 55-60°F for 3 days. Use prodiamine or dithiopyr.
- First Nitrogen: Wait until 50% green (mid-late April). Apply 0.5 lb N per 1000 sq ft. Use slow-release. St. Augustine needs much less than Bermuda.
🐛 Pest/Disease Watch: None yet. Too early for most issues.
🔧 Other Tasks:
- Core aeration if soil compacted (best time for St. Augustine)
- Verticut to remove thatch if not done in March
- Best time to install sod (soil 70°F+)
Zone 6: Green-up just starting. Zone 9-11: Fully green, begin regular mowing.
May - Full Green-Up
Primary Task: Resume Regular Care Routine
🌱 Grass Status: Fully green, active growth. Spreading begins but much slower than Bermuda.
✂️ Mowing: Every 7-10 days. St. Augustine grows slower than Bermuda. Cut to 1.5-2".
💧 Watering: 0.75-1" per week. St. Augustine's drought tolerance means it needs less water than Bermuda during growth.
🌿 Fertilization: Second application (optional): 0.5-0.75 lb N per 1000 sq ft. Many St. Augustine lawns skip this and wait until June. Don't over-fertilize - causes thatch buildup and weak growth.
🐛 Pest/Disease Watch:
- Watch for chinch bugs (white grubs in stem)
- Dollar spot may appear if cool/wet (less common than Bermuda)
- Monitor for armyworms (rare on St. Augustine but possible)
🔧 Other Tasks:
- Best time to install plugs (will have full season to establish)
- Spot-treat broadleaf weeds with 2,4-D (safe on St. Augustine)
- Edge beds - St. Augustine spreads slowly but steadily
June - Peak Growth Period
Primary Task: Maintain Regular Mowing & Watering
🌱 Grass Status: Peak growth and color. Dense, lush appearance. St. Augustine thrives in heat with adequate water.
✂️ Mowing: Every 7-10 days. Growth rate moderate (slower than Bermuda). Keep at 1.5-2". Sharp blade essential.
💧 Watering: 1" per week. Deep watering 1-2x per week preferred. St. Augustine's deep roots need infrequent but deep watering.
🌿 Fertilization: Third application: 0.5-0.75 lb N per 1000 sq ft. This is peak feeding month. Use balanced fertilizer (15-5-10 or similar).
🐛 Pest/Disease Watch:
- Brown patch risk if hot + humid + wet mornings
- Grubs feeding on roots (apply preventive if history of problems)
- Chinch bugs in stressed, dry areas
🔧 Other Tasks:
- Check irrigation coverage - St. Augustine shows drought stress (bluish tinge, footprints remain)
- Apply iron (ferrous sulfate) if color fades - safer than excess nitrogen
- Avoid heavy traffic on newly established areas
July - Peak Summer
Primary Task: Minimal Inputs, Let St. Augustine Thrive
🌱 Grass Status: Handling heat excellently. St. Augustine performs better in heat than most grasses with less water.
✂️ Mowing: Every 10-14 days. Growth slows in extreme heat. Keep at 1.5-2".
💧 Watering: 1-1.25" per week. St. Augustine can survive on less but looks best with adequate water. Water deeply, infrequently.
🌿 Fertilization: None needed. St. Augustine doesn't need mid-summer feeding like Bermuda. Excess nitrogen in July causes disease and thatch.
🐛 Pest/Disease Watch:
- Brown patch in humid climates (circular tan patches with dark border)
- St. Augustine patch (similar to spring dead spot - sunken circular patches)
- Sod webworms (less common than on Bermuda)
🔧 Other Tasks:
- Raise mowing height to 2-2.5" if heat stress appears
- Avoid heavy applications of anything in July heat
- Spot-treat weeds carefully - avoid spraying in 85°F+ temps
August - Late Summer
Primary Task: Light Feeding, Monitor Thatch
🌱 Grass Status: Still growing well but beginning to slow late month as nights cool.
✂️ Mowing: Every 10-14 days. Growth slowing. Keep at 1.5-2".
💧 Watering: 1" per week early August, reduce to 0.75" late August.
🌿 Fertilization: Fourth application (final, optional): 0.25-0.5 lb N per 1000 sq ft. Light feeding only. Many skip this entirely. Use slow-release.
🐛 Pest/Disease Watch:
- Fall armyworms may appear (less likely than Bermuda)
- Continue brown patch monitoring if humid
- Nutsedge visible in thin areas - spot treat
🔧 Other Tasks:
- Core aerate if thatch >0.5" (St. Augustine prone to thatch buildup)
- Verticut to remove excess thatch
- Last month to establish new sod
- Do NOT overseed St. Augustine with ryegrass - not compatible
September - Early Fall
Primary Task: Enjoy Low Maintenance Period
🌱 Grass Status: Growth slowing significantly but still green and healthy. St. Augustine stays green longer than Bermuda in fall.
✂️ Mowing: Every 14 days or as needed. Growth minimal by late September.
💧 Watering: 0.5-0.75" per week. Reduce as temps drop and rainfall increases.
🌿 Fertilization: None. No fall fertilization needed for St. Augustine.
🐛 Pest/Disease Watch: Minimal. Cooler temps reduce issues.
🔧 Other Tasks:
- Fall pre-emergent for winter annual weeds (if needed)
- Soil test for next year's plan
- Continue raking leaves promptly - don't smother dense St. Augustine
Zone 9-11: Continue normal care, St. Augustine stays fully green.
October - Fall Slowdown
Primary Task: Prepare for Dormancy
🌱 Grass Status: Slowing dramatically. Color fading from deep green to lighter green/yellow-green. St. Augustine stays green longer than Bermuda.
✂️ Mowing: Every 2-3 weeks or as needed. Growth minimal.
💧 Watering: 0.5" per week or less. Reduce further if rainfall sufficient.
🌿 Fertilization: None.
🔧 Other Tasks:
- Rake leaves promptly - don't let them mat down
- Last mowing of season late October (zones 7-8)
- Drain and winterize irrigation system
- Clean mower thoroughly - St. Augustine's tough blades dull blades faster
November - Dormancy Begins
Primary Task: Enter Dormancy
🌱 Grass Status: Turning tan/brown as temps drop below 50°F consistently. St. Augustine enters dormancy later than Bermuda.
✂️ Mowing: None.
💧 Watering: None needed.
🌿 Fertilization: None.
🔧 Other Tasks:
- Stay off dormant grass when frozen
- Continue raking leaves if trees still dropping
- Review year's maintenance - calculate total fertilizer used (should be 1-3 lbs N total)
Zone 9-11: May stay green year-round in warmest areas.
December - Full Dormancy
Primary Task: Rest Period
🌱 Grass Status: Fully dormant, brown. Crown and roots alive underground. St. Augustine's cold tolerance allows survival to Zone 6.
✂️ Mowing: None.
💧 Watering: None.
🌿 Fertilization: None.
🔧 Other Tasks:
- Avoid traffic on dormant/frozen grass
- Plan next year's projects
- Order sod or plugs early for spring delivery
- Appreciate St. Augustine's low-maintenance nature - calculate savings vs Bermuda
Annual Maintenance Summary
- Total Fertilizer: 1-3 lbs N per 1000 sq ft (split across 2-4 applications, April-August). Much lower than Bermuda's 3-6 lbs.
- Mowing Season: April-October (zones 7-8), year-round with reduced frequency (zones 9-11)
- Mowing Frequency: Every 7-14 days peak season (vs Bermuda's 2-3x per week). Significant time savings.
- Peak Maintenance: May-June (much shorter intensive period than Bermuda)
- Dormancy: November-April (zones 7-8), stays green year-round (zones 9-11)
- Best Time to Establish: Late April - June (when soil 70°F+)
- Best Time to Dethatch: Late April or Late August (annual dethatching recommended)
- Water Needs: 30-40% less than Bermuda due to superior drought tolerance
Mowing St. Augustine Grass
St. Augustine's slow growth rate is one of its greatest advantages - requiring significantly less mowing than Bermuda grass. However, St. Augustine's tough, wiry blades demand sharp mower blades for a clean cut. Proper mowing enhances St. Augustine's naturally dense, carpet-like appearance while reducing maintenance time compared to other warm-season grasses.
Optimal Mowing Heights
- Recommended Range: 1-2.5 inches for home lawns
- Minimum Height: 1 inch (requires more frequent mowing and sharp blades)
- Maximum Height: 3 inches (before density and appearance decline)
- Golf Course Fairways: 0.5-1 inch (fine-bladed cultivars only)
- Low-Maintenance Lawns: 2-2.5 inches (recommended for homeowners)
Height Recommendations by Priority:
- Maximum Density & Carpet Appearance: 1-1.5 inches (St. Augustine's natural density shines at low heights)
- Balanced Maintenance: 1.5-2 inches (allows weekly mowing, excellent appearance)
- Minimum Maintenance: 2-2.5 inches (bi-weekly mowing, still looks good)
- Shade Tolerance: 2-2.5 inches (taller grass captures more light in partial shade)
- Drought Tolerance: 2-2.5 inches (taller grass = deeper roots)
Comparison to Bermuda: St. Augustine maintains excellent density at 2-2.5 inches (where Bermuda thins out). This flexibility is a major advantage for low-maintenance lawns.
Mowing Frequency (Time Savings vs Bermuda)
The 1/3 Rule: Never remove more than 1/3 of the blade height in a single mowing. This prevents shock and maintains density.
Seasonal Frequency Guide:
- April (Early Green-Up): Every 14 days or as needed (slow initial growth)
- May-June (Peak Growth): Every 7-10 days (fastest growth period, but still slower than Bermuda)
- July-August (Summer): Every 10-14 days (growth slows in extreme heat)
- September-October (Fall): Every 14-21 days (growth slowing rapidly)
- November-March (Dormant): None (grass not growing)
Annual Mowing Time Comparison (5,000 sq ft lawn)
| Grass Type | Peak Season Frequency | Annual Mowings | Time per Mowing | Total Annual Time |
|---|---|---|---|---|
| Bermuda Grass | 2-3x per week | 80-100 times | 30 minutes | 40-50 hours |
| St. Augustine Grass | 1x per week | 28-32 times | 30 minutes | 14-16 hours |
| Time Savings: 24-34 hours per year (60-70% less mowing) | ||||
This is St. Augustine's #1 practical advantage for busy homeowners. At $40/hr professional mowing rates, St. Augustine saves $960-$1,360 annually in mowing costs for a 5,000 sq ft lawn.
Tip: Even in peak June growth, St. Augustine rarely needs mowing more than once per week. If you're gone for 10 days on vacation, St. Augustine won't be overgrown when you return (unlike Bermuda which could grow 4+ inches).
Best Mower Types for St. Augustine
Rotary Mower (Most Common)
- Best For: Home lawns mowed at 1.5-2.5 inches
- Pros: Works well for most St. Augustine lawns, handles varied terrain
- Cons: Must have sharp blade - St. Augustine's tough blades will tear with dull blade
- Blade Sharpness: CRITICAL for St. Augustine! Sharpen every 15-20 hours (more often than Bermuda). St. Augustine's wiry texture dulls blades faster.
- Power Requirement: Use self-propelled mower - St. Augustine's density creates more resistance than other grasses
- See our reviews: Best Lawn Mowers for St. Augustine Grass
Reel Mower (Professional Quality)
- Best For: St. Augustine lawns mowed below 1.5 inches, golf course appearance
- Pros: Cleanest cut possible, handles St. Augustine's tough blades well, promotes maximum density
- Cons: Expensive ($800-$3000+), requires frequent adjustment and maintenance
- Use Case: Serious lawn enthusiasts seeking putting-green appearance. St. Augustine cut with reel mower = ultimate lawn quality.
Manual Reel Mower
- St. Augustine Caveat: Standard manual reel mowers struggle with St. Augustine's dense, tough texture. Only high-quality manual reels ($300+) cut St. Augustine effectively.
- Not Recommended: Cheap ($100-150) manual reel mowers will frustrate homeowners. St. Augustine requires powered mower for most users.
Mulching vs. Bagging
- Mulching (Leave Clippings):
- Returns nutrients to soil (minimal since mowing infrequently)
- Saves time and disposal
- OK if mowing frequently and following 1/3 rule
- Risk: St. Augustine builds thatch quickly. If thatch >0.5", consider bagging
- Bagging (Remove Clippings):
- Reduces thatch buildup (important for St. Augustine)
- Cleaner appearance on dense St. Augustine
- Necessary if mowing wet or if grass overgrown (>1/3 height removed)
- Recommended: Bag clippings spring through summer to minimize thatch
Common Mowing Mistakes
❌ Using Dull Mower Blade
What it is: THE #1 mistake with St. Augustine. St. Augustine's tough, wiry blades tear easily with dull blades, leaving gray/brown tips.
Effects: Gray/brown lawn appearance, increased disease risk, slow recovery from mowing.
Solution: Sharpen blade every 15-20 mowing hours (more frequently than other grasses). Professional sharpening costs $10-15 and takes 24 hours. Keep spare blade on hand for quick swaps.
How to Check: After mowing, look closely at grass tips. Clean, green tips = sharp blade. Torn, brown/gray tips = dull blade.
❌ Infrequent Mowing (Removing >1/3 Height)
Problem: Skipping 2-3 weeks in peak season means removing >1/3 height, which shocks St. Augustine and exposes stems.
Effects: Temporary brown appearance, thinning, slow recovery.
Solution: Even with St. Augustine's slow growth, mow weekly May-July. If you skip 2+ weeks, gradually lower height over 2-3 mowings rather than scalping in one session.
❌ Mowing Too Low Too Fast in Spring
Problem: Dropping from 2.5" winter height to 1.5" in one spring mowing removes too much at once.
Prevention: Lower height gradually. Week 1: mow at 2". Week 2: lower to 1.75". Week 3: reach target 1.5".
Recovery: If scalped, fertilize lightly (0.25 lb N per 1000 sq ft), water regularly, be patient. St. Augustine recovers slowly (2-4 weeks).
❌ Mowing Wet St. Augustine
Problems: Clumping, uneven cut, soil compaction, disease spread, clogged mower. Worse than Bermuda due to density.
When to Mow: Wait until grass is completely dry (usually after 11am if morning dew). St. Augustine's density holds moisture longer than other grasses.
❌ Same Mowing Pattern Every Time
Problems: Creates ruts, compaction lines, grass "leans" in mowing direction (especially visible on dense St. Augustine).
Solution: Rotate pattern each mowing. Week 1: north-south. Week 2: east-west. Week 3: diagonal. St. Augustine's density makes patterns very visible, so rotation is essential for professional appearance.
St. Augustine Mowing Quick Reference
- ✅ Height: 1.5-2 inches for balanced maintenance
- ✅ Frequency: Weekly May-July, bi-weekly rest of season
- ✅ Blade Sharpness: Sharpen every 15-20 hours (non-negotiable)
- ✅ Time Savings: 60-70% less mowing than Bermuda (24-34 hours/year saved)
- ✅ Equipment: Self-propelled rotary or reel mower. Must have adequate power for density.
- ✅ Clippings: Consider bagging to reduce thatch buildup
Fertilizing St. Augustine Grass
St. Augustine grass is a LOW feeder compared to Bermuda, requiring only 4-6 lbs N per 1000 sq ft annually (vs Bermuda's 3-6 lbs). Over-fertilizing St. Augustine causes thatch buildup, disease susceptibility, and weak growth. The key philosophy: "Less is more" with St. Augustine. Let the grass's natural density and color shine rather than forcing growth with excess nitrogen.
Annual Nitrogen Requirements
- Total Annual Nitrogen: 1-3 lbs N per 1000 sq ft per year
- Minimal Maintenance: 1-1.5 lbs N (survives beautifully, medium green)
- Moderate Maintenance (Recommended): 2-2.5 lbs N (dark green, excellent density)
- High Maintenance: 2.5-3 lbs N (maximum color and density, more thatch risk)
Application Schedule: Split into 2-4 applications from late April through August. Never fertilize during dormancy (November-April). Never exceed 1 lb N per application.
Fertilizer Savings vs Bermuda
5-Year Fertilizer Cost Comparison (5,000 sq ft lawn):
- Bermuda (5 lbs N/year × 5 years): 25 lbs N total = $300-450 in fertilizer
- St. Augustine (2 lbs N/year × 5 years): 10 lbs N total = $120-180 in fertilizer
- Savings: $180-270 over 5 years (60% less fertilizer)
Recommended Fertilization Schedule
Application #1 - Late April/Early May (Green-Up)
- Product: Pre-emergent + fertilizer combo (15-0-15 with Prodiamine — check price →, or 0-0-7 with Dimension)
- Rate: 0.5 lb N per 1000 sq ft (LOW application)
- Purpose: Wake grass from dormancy, prevent crabgrass. Don't over-do it - St. Augustine greens up slowly regardless.
- Timing: When grass is 50% green (usually late April in zones 7-8). Soil temp 60°F+ for 3 days.
- Note: If you applied pre-emergent without fertilizer in early April, you can skip this and wait until June.
Application #2 - June (Peak Feeding)
- Product: Balanced fertilizer (15-5-10, 16-4-8, or similar with 50%+ slow-release N)
- Rate: 0.75-1 lb N per 1000 sq ft (main feeding of the year)
- Purpose: Fuel summer growth, maintain density and color
- Timing: When grass is fully green and actively growing
- Note: This is the most important application. Use slow-release to reduce thatch and provide sustained feeding.
Application #3 - Late July/Early August (Optional)
- Product: Light application of 15-5-10 or 10-10-10
- Rate: 0.5 lb N per 1000 sq ft (light feeding only)
- Purpose: Maintain color through late summer
- Timing: Apply in early morning, water in immediately
- Note: SKIP this application if grass is dark green and dense. Many St. Augustine lawns do fine on just 2 applications per year (April + June).
Application #4 - Late August (Final, Optional)
- Product: Slow-release fertilizer (15-5-10 with 70%+ slow-release N)
- Rate: 0.25-0.5 lb N per 1000 sq ft (very light)
- Purpose: Carry grass into fall without stimulating excessive growth
- Note: Skip if grass is already very dense or if thatch >0.5". Most homeowners skip this entirely.
Simplified Schedule (Recommended for Most Homeowners)
For busy homeowners who want excellent St. Augustine with minimal effort, use this 2-3 application schedule:
| Month | Product | Rate (lbs N per 1000 sq ft) | Purpose |
|---|---|---|---|
| Late April | Pre-emergent + low-N fertilizer (0-0-7 or 15-0-15) | 0.5 lb N | Prevent crabgrass, light green-up |
| June | Balanced slow-release (16-4-8 or 15-5-10) | 1 lb N | Main feeding of the year |
| Late July (Optional) | Light application (15-5-10) | 0.5 lb N | Maintain color if fading |
| Total Annual Nitrogen: | 1.5-2 lbs N per 1000 sq ft | ||
Result: Excellent St. Augustine lawn with dark green color, high density, and minimal thatch. Many professionals use only 2 applications (April + June) with great success.
Understanding N-P-K Ratios
Fertilizer bags show three numbers (e.g., 16-4-8), representing:
- N (Nitrogen): Promotes green color and growth. St. Augustine needs MODERATE nitrogen (unlike Bermuda's high N needs).
- P (Phosphorus): Root development. Needed for establishment, less for mature lawns. Many states restrict P in lawn fertilizers.
- K (Potassium): Stress tolerance, disease resistance, cold hardiness, drought tolerance. Important for St. Augustine's resilience.
Best Ratios for St. Augustine:
- Establishment: 18-24-12 (higher phosphorus for root development in new sod/plugs)
- Maintenance: 3-1-2 or 4-1-2 ratio (e.g., 15-5-10, 16-4-8) with 50%+ slow-release N
- Summer: Balanced slow-release (16-4-8, 15-5-10). Avoid high-N (30-0-10) which Bermuda uses.
Slow-Release is Critical for St. Augustine: Look for products with 50-70% slow-release nitrogen (labeled as "sulfur-coated urea," "polymer-coated," "methylene urea," or "IBDU"). Slow-release prevents growth spikes, reduces thatch, and provides consistent feeding for 8-12 weeks.
Iron for Enhanced Color (Without Growth)
St. Augustine responds excellently to iron supplementation, producing deep blue-green color without stimulating growth or thatch buildup. Iron is the secret weapon for dark green St. Augustine with minimal nitrogen.
When to Apply Iron:
- Color fades but grass is already dense (no need for more nitrogen)
- Mid-summer when you want darker color without more mowing
- Complementing low-nitrogen fertility program (1-2 lbs N/year)
- Before special events when you want maximum color
Iron Products & Application:
- Ferrous Sulfate (Granular): 2-4 lbs per 1000 sq ft. Water in immediately. Results in 7-10 days. Lasts 3-4 weeks.
- Chelated Iron (Liquid): 1-2 oz per 1000 sq ft mixed with water. Spray evenly. Results in 3-5 days. Lasts 2-3 weeks.
- Iron + Nitrogen Combo: Products like "Ironite" combine low N (1-0-1) with iron. Safe for frequent application.
- Frequency: Every 3-4 weeks during growing season if desired. Iron cannot "burn" grass like nitrogen.
⚠️ Warning: Iron stains concrete, pavers, siding, and clothing PERMANENTLY. Apply carefully, sweep off hardscapes immediately, and water in thoroughly. Wear old shoes and clothes.
Pro Tip: Use iron + low nitrogen (1.5-2 lbs N annually) instead of high nitrogen (3+ lbs) for same color with less mowing, less thatch, and lower cost. This is the low-maintenance St. Augustine approach.
⚠️ Dangers of Over-Fertilizing St. Augustine
Over-fertilization is more damaging to St. Augustine than under-fertilization. Excess nitrogen causes:
- Rapid Thatch Buildup: Thatch >0.5" in one season. Requires expensive dethatching.
- Soft, Weak Growth: Lush but weak blades susceptible to disease, insects, and traffic damage
- Brown Patch Disease: Excess nitrogen + humidity = brown patch fungus (circular dead patches)
- Excessive Mowing: Defeats St. Augustine's low-maintenance advantage. Forces weekly mowing when bi-weekly is sufficient.
- Reduced Drought Tolerance: Soft growth has shallow roots, needs more water
- Higher Costs: More fertilizer, more mowing, more dethatching, more water, more disease treatment
Remember: St. Augustine evolved in poor soils with low fertility. It THRIVES on minimal inputs. If your St. Augustine is dark green and dense on 1.5-2 lbs N annually, don't add more just because "more fertilizer = better lawn" (that's Bermuda thinking, not St. Augustine thinking).
St. Augustine Fertilization Quick Reference
- ✅ Annual Total: 1.5-2.5 lbs N per 1000 sq ft (vs Bermuda's 4-6 lbs)
- ✅ Applications: 2-3 times per year (vs Bermuda's 5-6 times)
- ✅ Timing: Late April, June, optional late July/August
- ✅ Product: Balanced slow-release (15-5-10, 16-4-8 with 50%+ slow-release N)
- ✅ Iron: Use every 3-4 weeks for dark color without growth
- ✅ Cost Savings: 60% less fertilizer than Bermuda ($180-270 saved over 5 years)
- ❌ Avoid: High-nitrogen fertilizers (30-0-10, 34-0-0), quick-release nitrogen, over-fertilization
Total Cost of Ownership: 5-Year Analysis
St. Augustine has higher upfront establishment costs than Bermuda but significantly lower annual maintenance costs. Over 5 years, St. Augustine from plugs is the MOST cost-effective warm-season grass option. St. Augustine from sod costs similar to Bermuda sod initially but saves money annually due to reduced fertilizer, mowing, and water needs.
5-Year Cost Breakdown (1,000 sq ft)
Scenario 1: St. Augustine Plugs (DIY - Budget Option)
| Year | Items | Cost |
|---|---|---|
| Year 1 (Establishment) |
St. Augustine plugs (120-150 plugs) $200 Starter fertilizer $20 Soil prep $40 Water (extra for establishment) $20 Weed control (hand-pulling + spot spray) $15 | $295 |
| Year 2 (Fill-In Period) |
Fertilizer (2-3 apps) $40 Pre-emergent $15 Weed control (spot treatment) $15 Water (reduced from Year 1) $30 Mower blade sharpening $15 | $115 |
| Year 3 |
Fertilizer (2-3 apps) $45 Pre-emergent $15 Post-emergent (minimal) $10 Iron supplement $15 Water $25 Dethatching (rental) $40 | $150 |
| Year 4 |
Fertilizer (2-3 apps) $45 Pre-emergent $15 Iron supplement $15 Water $25 Blade sharpening $15 | $115 |
| Year 5 |
Fertilizer (2-3 apps) $45 Pre-emergent $15 Core aeration $50 Water $25 Blade sharpening $15 | $150 |
| 5-YEAR TOTAL (DIY Plugs): | $825 | |
| Per year average: | $165/year | |
Lowest Cost Option: St. Augustine from plugs is the cheapest warm-season grass over 5 years, despite slow establishment. Requires patience.
Scenario 2: St. Augustine Sod (DIY - Most Common)
| Year | Items | Cost |
|---|---|---|
| Year 1 (Establishment) |
St. Augustine sod (2 pallets) $600 Starter fertilizer $20 Soil prep $40 Roller rental $40 Water (extra for establishment) $30 | $730 |
| Years 2-5 (Maintenance) |
Same as plug scenario (Low annual maintenance) | $530 |
| 5-YEAR TOTAL (DIY Sodded): | $1,260 | |
| Per year average: | $252/year | |
Instant Results, Lower Maintenance: Higher upfront cost than Bermuda sod, but annual savings ($40-80/year) due to less fertilizer, mowing, and water make it comparable over 5 years.
Scenario 3: Professional Service
| Year | Service | Cost |
|---|---|---|
| Year 1 |
Professional sod installation $1,500 (includes sod, prep, labor - higher than Bermuda due to sod cost) | $1,500 |
| Years 2-5 |
Lawn care service (fertilization, pre-emergent, weed control, aeration - 4-5 visits/year) @ $50/visit = $225/year | $900 |
| Mowing service (14-18 cuts/year @ $35) | $2,240 | |
| 5-YEAR TOTAL (Full Service): | $4,640 | |
| Per year average: | $928/year | |
Professional Cost Savings: St. Augustine saves $1,880 over 5 years vs Bermuda professional service ($4,640 vs $6,520) due to 50-60% fewer mowing visits. If you mow yourself, total drops to $2,400.
Cost Comparison: St. Augustine vs. Other Grasses
| Grass Type | Establishment (1000 sq ft) | Annual Maintenance | 5-Year Total (DIY) |
|---|---|---|---|
| St. Augustine (plugs) ← CHEAPEST | $295 | $115-150 | $825 |
| St. Augustine (sod) | $730 | $115-150 | $1,260 |
| Bermuda (seeded) | $160 | $165-240 | $1,005 |
| Bermuda (sodded) | $530 | $165-240 | $1,375 |
| St. Augustine (sod) | $600 | $180-250 | $1,520 |
| Tall Fescue (seeded) | $120 | $200-280 | $1,160 |
| Kentucky Bluegrass (seeded) | $150 | $220-300 | $1,290 |
Key Takeaways:
- St. Augustine from plugs is THE cheapest long-term option ($825 over 5 years) - 18% cheaper than seeded Bermuda ($1,005), but requires 12-24 month establishment patience.
- St. Augustine sod costs more upfront ($730 vs $530 Bermuda sod) but saves $40-80/year in maintenance = breaks even by Year 5-7.
- St. Augustine maintenance is 30-40% cheaper than Bermuda ($130/year vs $200/year) due to:
- 60% less fertilizer ($45 vs $90/year)
- 50% less mowing = less gas, blade sharpening (~$25/year savings)
- 20-30% less water (~$10-15/year savings)
- Professional mowing service savings are massive: St. Augustine needs 14-18 cuts/year vs Bermuda's 28-32 cuts = $490-700 saved annually on mowing ($2,000-3,000 over 5 years).
- Return on investment: Higher St. Augustine sod cost ($200 more than Bermuda) is recovered in 3-4 years through lower maintenance.
Long-Term Value Proposition
10-Year Outlook: Over 10 years, St. Augustine's advantage grows dramatically:
- St. Augustine (sod): $730 + (9 years × $130/year) = $1,900
- Bermuda (sod): $530 + (9 years × $200/year) = $2,330
- 10-Year Savings: $430 favoring St. Augustine
Plus time savings: St. Augustine saves 24-34 hours/year mowing = 240-340 hours over 10 years. At $40/hr value of time, that's $9,600-13,600 in opportunity cost savings!
Factors That Increase Costs
- Premium Cultivars: St. Augustine varieties like "CitraBlue," "Meyer," "Palmetto" may cost $50-150 more per 1000 sq ft than standard St. Augustine.
- Poor Soil: Heavy clay or pure sand may need $100-200 in amendments before installation.
- Severe Thatch: If previous owner over-fertilized, dethatching may be needed annually ($40-75). Preventable with proper maintenance.
- Equipment: St. Augustine's density requires self-propelled mower. If buying new, add $400-900 (one-time cost).
- Impatience with Plugs: Some homeowners buy more plugs (6" spacing instead of 12") to speed fill-in, doubling plug cost to $400-500.
Ways to Reduce Costs
- Choose Plugs Over Sod: Saves $400-500 upfront if you can wait 12-24 months. Biggest savings opportunity.
- Minimal Fertilization: Use only 1.5-2 lbs N annually. Avoid the temptation to over-fertilize. Saves $30-50/year.
- Use Iron Instead of Extra Nitrogen: $15 iron application replaces $30 fertilizer application with better results.
- Buy Sod in Fall: Some suppliers discount St. Augustine sod 10-20% in August-September as season ends.
- DIY Dethatching: Manual dethatching rake costs $25 and lasts forever vs $40/year rental or $75 professional service.
- Maintain Sharp Blade: DIY sharpening with $15 file takes 15 minutes, saves $10-15 per sharpening (3x/year = $30-45 annual savings).
- Mulch Clippings: Returns small amount of nitrogen, saves $10-20/year in fertilizer.
Cost Summary: St. Augustine's Financial Case
✅ Upfront Investment
Plugs: $295 (budget option, patience required)
Sod: $730 (premium option, instant results)
✅ Annual Maintenance
$115-150/year (30-40% less than Bermuda's $165-240)
Lower fertilizer, mowing, water costs
✅ 5-Year Total
Plugs: $825 (cheapest warm-season option)
Sod: $1,260 (comparable to Bermuda despite higher upfront)
✅ Time Savings Value
24-34 hours/year less mowing than Bermuda
At $40/hr = $960-1,360/year value (or mowing service savings)
Bottom Line: St. Augustine is a long-term investment that pays off through dramatically reduced maintenance. The higher sod cost ($200 more than Bermuda) is recovered by Year 4 through lower annual costs. St. Augustine from plugs is the single cheapest way to establish a warm-season lawn, period.
Best Products for St. Augustine Grass
These are the top-rated products for establishing and maintaining St. Augustine grass, selected for St. Augustine's unique low-maintenance needs and tendency toward thatch buildup.
⚠️ Affiliate Disclosure
This guide contains affiliate links to products we've tested and recommend. If you purchase through these links, we earn a small commission at no extra cost to you. This helps us maintain free, in-depth guides like this one. We only recommend products we've personally used or thoroughly researched. Learn more about our review process.
🌱 Best St. Augustine Grass Plugs
St. Augustine Farm Nurseries St. Augustine Plugs (Meyer or Palmetto)
- Type: Floratam or Palmetto cultivar plugs (2" diameter, 3-4" deep)
- Coverage: 18 plugs per tray, plant on 8-12" centers
- Establishment: 12-18 months for full coverage (6" spacing), 18-24 months (12" spacing)
- Price: $25-40 per tray (18 plugs)
- Why Best: St. Augustine Farm is the original St. Augustine plug supplier (since 1970s), offering disease-free, guaranteed-to-grow plugs with high success rates. Floratam is the industry standard for cold hardiness (to Zone 6). Palmetto has slightly broader blades and faster establishment. Both are excellent choices for homeowners.
- Where to Buy:
🌿 Best Fertilizer for St. Augustine Grass
Lesco 16-4-8 Polyplus Slow-Release Fertilizer
- NPK: 16-4-8 (50% slow-release nitrogen)
- Coverage: 50 lb bag covers 12,500 sq ft at 0.75 lb N rate
- Price: $40-55 per 50 lb bag
- Application: Apply 2-3 times per year (April, June, optional August) for total of 1.5-2.5 lbs N annually
- Why Best: Specifically formulated for low-input, slow-growing grasses like St. Augustine. 50% slow-release nitrogen (polymer-coated) feeds for 8-12 weeks without growth spikes or thatch buildup. The 4-1-2 NPK ratio is perfect for St. Augustine's needs. Unlike high-N Bermuda fertilizers (30-0-10), this won't cause excessive growth or thatch. Professional-grade quality at reasonable price. Recommended by turfgrass professionals for St. Augustine maintenance.
- Where to Buy:
🚫 Best Pre-Emergent Herbicide
Prodiamine 65 WDG (Barricade)
- Active Ingredient: 65% Prodiamine
- Coverage: 1 lb treats 87,000-174,000 sq ft (depending on rate)
- Price: $50-70/lb
- Application: Apply once in late April when St. Augustine is 50% green. Second application not usually needed for St. Augustine lawns due to dense turf crowding out weeds.
- Why Best: Safe for established St. Augustine, provides 6-8 months residual control. Apply slightly later than Bermuda (wait until St. Augustine has greened up to avoid stressing during green-up). St. Augustine's natural density means less weed pressure than Bermuda, so single annual application often sufficient. Most cost-effective pre-emergent option.
- Where to Buy:
💧 Best Iron Supplement for St. Augustine
Southern Ag Chelated Liquid Iron
- Formula: 5% chelated iron (EDDHA chelated)
- Coverage: 1 quart treats 20,000 sq ft
- Price: $12-18/quart
- Application: Mix 2-3 oz per gallon of water, spray every 3-4 weeks May-August for deep blue-green color
- Why Best: THE secret weapon for St. Augustine. Provides dramatic dark green color (blue-green tint) in 3-5 days without stimulating growth, mowing, or thatch. Perfect for homeowners who want maximum color on minimal nitrogen (1.5-2 lbs N/year). Chelated form won't stain concrete. Iron every 3-4 weeks + low nitrogen (2 apps/year) = dark green St. Augustine with almost no mowing. This is the low-maintenance St. Augustine approach professionals use.
- Where to Buy:
🔧 Best Dethatching Rake for St. Augustine
Ames Adjustable Dethatching Rake
- Type: Manual dethatching rake with 15-inch head, spring steel tines
- Price: $25-35
- Use: Annual dethatching in late April/early May when St. Augustine is actively growing
- Why Best: St. Augustine builds thatch faster than Bermuda (due to dense growth + low fertilizer decomposition). Manual dethatching rake is perfect for annual maintenance to keep thatch under 0.5". More practical than renting power dethatcher ($40-60 per use) for annual maintenance. Use in spring when St. Augustine is growing vigorously - it will quickly recover from aggressive raking. Takes 30-45 minutes per 1,000 sq ft. Pays for itself after one use vs rental.
- Where to Buy:
⚠️ Chemical Safety & Responsibility
IMPORTANT: Herbicides and pesticides can be harmful if misused. Follow these safety guidelines:
- Read ALL label instructions before use. The label is the law.
- Wear protective equipment: Gloves, long sleeves, pants, closed-toe shoes, and eye protection when mixing and applying.
- Keep children and pets off treated areas as directed on product label (typically 24-48 hours or until dry).
- Do NOT apply before rain or when rain is forecast within 24 hours - runoff can contaminate waterways.
- Store products securely in original containers, away from children, pets, and food.
- Dispose of properly - never pour down drains. Contact local hazardous waste facility for disposal.
- When in doubt, hire a licensed professional applicator.
💡 St. Augustine-Specific Application Tips
- Less is more: St. Augustine thrives on minimal inputs. Don't over-fertilize trying to "help" - you'll create thatch problems.
- Sharpen blades frequently: St. Augustine's tough blades dull mower blades faster. Sharpen every 15-20 hours vs 20-25 for Bermuda.
- Use slow-release always: Quick-release nitrogen causes growth spikes and thatch. Look for 50-70% slow-release products.
- Iron instead of nitrogen: When color fades, apply iron first before adding more nitrogen. Saves money, reduces mowing.
- Dethatch annually: Budget $25 for manual rake or $50 for power dethatcher rental. Annual spring dethatching prevents buildup.
Comprehensive Chinch Bug Management: The #1 St. Augustine Threat
Blunt reality: If you grow St. Augustine grass in the southern United States, you WILL deal with chinch bugs. Not maybe, not probably—definitely.
The southern chinch bug (Blissus insularis) evolved alongside St. Augustine grass in its native coastal habitat. They're specialists—they prefer St. Augustine over every other turfgrass, and they're incredibly good at finding it.
I've seen chinch bugs destroy 5,000 square feet of beautiful St. Augustine in 3-4 weeks during summer. One homeowner in Tampa went on vacation for 10 days in July—came back to 40% of his lawn dead. The grass looked fine when he left. Chinch bugs don't mess around.
This comprehensive section covers:
- Complete chinch bug biology and life cycle
- The float test monitoring method (step-by-step)
- Treatment thresholds and control strategies
- Prevention programs that actually work
- Seasonal management calendars
Part 1: Chinch Bug Biology & Behavior
Species Identification
Southern Chinch Bug (Blissus insularis)
- Size: Adults 1/6 to 1/5 inch long (about 3-4mm)
- Color: Black body with white wings forming distinctive X pattern on back
- Nymphs: Bright red/orange when young, darker as they mature
- Habitat: Thatch layer and upper soil of St. Augustine lawns
Visual Identification by Life Stage:
- Eggs: Laid in leaf sheaths and thatch, creamy white, oval, tiny (nearly invisible)
- 1st-2nd instar nymphs: Bright red/orange bodies, 1mm long, very active
- 3rd-5th instar nymphs: Orange to brown, developing wing pads, 2-3mm
- Adults: Black with white wings, fully developed, capable of flying (though they rarely do)
Adults live 60-80 days and females lay 200-300 eggs during their lifetime. Do the math—one pregnant female can turn into thousands of chinch bugs in a single summer.
💡 PRO TIP: If you see tiny red bugs crawling in your St. Augustine thatch (especially in hot sunny areas), those are chinch bug nymphs. By the time you see hundreds of them, you've got a problem that's 2-3 weeks old. Early detection is everything.
Life Cycle & Development
Temperature-Dependent Development:
Chinch bugs are cold-blooded insects. Their development speed depends entirely on temperature.
| Temperature | Egg Stage | Nymph Stages | Complete Cycle | Generations/Year |
|---|---|---|---|---|
| 85-95°F (Optimal) | 7-10 days | 30-40 days | 40-50 days | 5-7 generations |
| 70-80°F (Cooler) | 14-21 days | 50-70 days | 70-90 days | 2-3 generations |
| <65°F (Cold) | Development stops - Adults overwinter, eggs/nymphs die | 0 (overwintering) | ||
Translation: Under perfect summer conditions (common May-September in Florida, Texas, Louisiana), you can get 5-7 generations per year. Each generation exponentially larger than the last.
⚠️ COMMON MISTAKE: Homeowners think chinch bugs are gone in winter because damage stops. Wrong. Adults are hiding in your thatch waiting for spring. They'll emerge when soil temperatures hit 65°F and start the cycle again.
Feeding Behavior & Damage Mechanism
How Chinch Bugs Kill Grass:
Chinch bugs are sap-sucking insects with piercing-sucking mouthparts (like aphids or stink bugs).
The Damage Process:
- Piercing: Chinch bug inserts needle-like stylet into grass blade or stem
- Injection: Releases toxic saliva containing enzymes
- Feeding: Sucks out plant sap (nutrients and water)
- Systemic Damage: Toxins disrupt vascular system, grass can't transport water
- Death: Grass yellows, then browns, then dies
The toxin is key—it's not just mechanical damage from sap removal. The saliva causes vascular collapse. Even moderate chinch bug populations can kill grass during water stress because the grass literally cannot move water from roots to blades.
Feeding Preferences:
- Hot, sunny areas (south and west-facing exposures)
- Dry, drought-stressed turf (chinch bugs avoid wet grass)
- Thatch-heavy lawns (provides shelter and breeding habitat)
- Over-fertilized turf (lush succulent growth = more sap)
Chinch bugs almost never attack shaded, well-irrigated St. Augustine. They're sun-loving, drought-following pests.
Damage Pattern Recognition
Stage 1 - Initial Infestation (Week 1-2)
- Small irregular yellow/brown patches in sunniest areas
- Grass looks slightly off-color or drought-stressed
- Damage spreads outward slowly
- Easy to mistake for drought, fertilizer burn, or disease
Stage 2 - Active Damage (Week 3-4)
- Patches expand rapidly (6-12 inches per week)
- Clear distinction between healthy green grass and dead brown grass
- Damage follows sun exposure patterns (worse on south/west sides)
- Grass pulls up easily with no roots attached
Stage 3 - Severe Infestation (Week 5+)
- Large dead areas (hundreds to thousands of square feet)
- Chinch bugs visible in thatch at edge of damage
- Population so high they migrate to healthy areas
- Secondary weeds invade dead spots
💡 PRO TIP: The edge between healthy and damaged grass is where you'll find the most chinch bugs. They feed at the border and move outward. When scouting, always check the transition zone, not the dead center of damage.
Why St. Augustine is Vulnerable
St. Augustine grass is chinch bug candy. Here's why:
Reason #1: Thick Thatch Layer
- St. Augustine produces dense thatch quickly
- Thatch provides perfect microhabitat: humid, protected, 10-15°F warmer than air temperature
- Chinch bugs lay eggs in thatch, nymphs develop in thatch, adults hide in thatch
- Lawns with 1"+ thatch layer = chinch bug heaven
Reason #2: Stoloniferous Growth
- St. Augustine spreads via surface runners (stolons)
- Stolons create additional thatch and shelter
- More surface area for chinch bugs to colonize vs rhizomatous grasses
Reason #3: Genetic Susceptibility
- Some St. Augustine cultivars produce compounds that attract chinch bugs
- Floratam was resistant for decades, now resistance is largely broken
- No truly resistant cultivars exist anymore
Cultivar Susceptibility Rankings
| Cultivar | Susceptibility Level | Notes |
|---|---|---|
| Floratam | ⭐⭐⭐⭐ High | Resistance broken in most areas |
| Palmetto | ⭐⭐⭐⭐ High | Very susceptible |
| Raleigh | ⭐⭐⭐⭐⭐ Very High | Extremely vulnerable |
| Seville | ⭐⭐⭐ Moderate | Somewhat better |
| Bitterblue | ⭐⭐⭐ Moderate | No immunity |
| Captiva | ⭐⭐⭐ Moderate | Better than Floratam |
| CitraBlue | ⭐⭐⭐ Moderate | Newer, less data |
Bottom line: Don't count on cultivar resistance. All St. Augustine varieties can be destroyed by chinch bugs under the right conditions.
Environmental Triggers for Outbreaks
Chinch bug populations don't just appear randomly. Specific conditions trigger explosive outbreaks.
Trigger #1: Drought Stress
Mechanism: Drought-stressed grass = lower water content = concentrated sugars/sap = more attractive to chinch bugs
Timeline: 2-3 weeks of insufficient irrigation during summer
Result: Chinch bug populations double every 10-14 days
Trigger #2: Heat Waves
Mechanism: Temperatures >90°F accelerate chinch bug development
Math: At 95°F, egg-to-adult development takes 35-40 days vs 60+ days at 80°F
Result: More generations per season = exponential population growth
Trigger #3: Over-Fertilization
Mechanism: High nitrogen = lush succulent growth = tender plant tissue = easier for chinch bugs to pierce and feed
Observation: Lawns receiving >6 lbs N per year have higher chinch bug damage rates
Trigger #4: Thatch Accumulation
Critical Threshold: >0.75 inches of thatch
Measurement: Push screwdriver into turf, measure spongy layer above soil
Seasonal Outbreak Patterns
| Season | Activity Level | Risk | Action Required |
|---|---|---|---|
| Spring (March-May) | Overwintered adults emerge at 65°F, first generation nymphs appear | Low to Moderate | Begin preventive monitoring |
| Summer (June-August) | Peak season - 3-4 overlapping generations, populations at maximum | VERY HIGH | Weekly monitoring required |
| Fall (September-November) | Populations peak in Sept, decline in Oct, last generation seeks overwintering sites | Moderate (early), Low (late) | Continue monitoring through October |
| Winter (December-February) | Adults overwinter in thatch, no feeding or reproduction | None | None needed |
⚠️ CRITICAL: The biggest outbreak risk is May-July when the first spring generation transitions into the second summer generation. Miss the early warning signs in May, and you'll have a disaster by July.
Damage vs Drought: How to Tell the Difference
The #1 misdiagnosis: Homeowners think chinch bug damage is drought stress. They increase irrigation, grass doesn't recover, by the time they figure it out the damage is catastrophic.
| Characteristic | Drought Stress | Chinch Bug Damage |
|---|---|---|
| Color Change | Blue-gray before yellowing | Yellows, then browns directly |
| Pattern | Affects entire lawn somewhat uniformly | Irregular patches in hot sunny areas |
| Response to Water | Recovers within 24-48 hours | Does NOT respond to irrigation |
| Root Attachment | Grass stays rooted | Affected grass pulls up easily |
| Location | High spots, poor irrigation coverage | South/west exposures, near pavement |
| Spread Pattern | Doesn't spread | Damage spreads outward from patches |
Definitive Test: Float Test (detailed procedure in next section)
💡 PRO TIP: When in doubt, do the float test. Takes 10 minutes and costs nothing. Misdiagnosis costs hundreds to thousands in dead grass replacement.
Part 2: The Float Test & Monitoring Protocols
The Coffee Can That Saves Your Lawn
I cannot overstate this: Weekly float testing during chinch bug season (May-September) is the single most valuable 10 minutes you'll spend on lawn care.
Catching chinch bugs at population levels of 20-30 per square foot (early infestation) vs 200-300 per square foot (major outbreak) is the difference between a $30 insecticide application and $2,000 lawn replacement.
The Float Test Method: Step-by-Step
Materials Needed:
- Large coffee can or similar container (32 oz or larger)
- Can opener to remove bottom
- Water source (hose or bucket)
- 5-10 minutes
Step 1: Remove both ends of coffee can
- Cut out bottom with can opener
- Remove top if still attached
- You now have a metal cylinder (acts like a "core sampler")
Step 2: Select test location
- Target edge between healthy and damaged grass
- Push can 2-3 inches into soil (twist to cut through grass)
- Make sure bottom of can penetrates thatch layer
Step 3: Fill with water
- Pour water into can until it's full to the rim
- Maintain water level for 5-10 minutes
- Add more water as it drains into soil
Step 4: Observe surface
- Watch water surface for floating insects
- Chinch bugs will float to surface within 2-3 minutes
- Continue observing for full 10 minutes
Step 5: Count and identify
- Adults: Black with white X-pattern wings
- Nymphs: Red/orange (young) or tan/brown (older)
- Count both adults and nymphs
- Note numbers for threshold determination
Why This Works:
Chinch bugs live in the thatch layer just above the soil. When you flood their habitat, they try to escape drowning by floating to the surface. The metal can creates a contained test area with known size, so you can calculate population density.
One coffee can = approximately 0.1 square feet of turf
If you count 20 chinch bugs in the can, that's roughly 200 per square foot. That's treatment threshold territory.
⚠️ COMMON MISTAKE: Testing in the dead center of damaged areas. Chinch bugs have already killed the grass there and moved to the edges. ALWAYS test at the transition zone between healthy and dead grass.
When to Monitor
| Month | Activity | Test Frequency | Focus Areas |
|---|---|---|---|
| May | Start monitoring - overwintered adults active, first generation nymphs appearing | Every 7-10 days | Sunniest spots, driest areas |
| June-August | PEAK SEASON - multiple generations overlapping, highest risk | Every 5-7 days | Expand to multiple locations |
| September | Declining populations - last generation maturing, risk decreasing | Every 7-10 days | Can reduce by mid-month |
| October-April | Minimal monitoring - adults overwintering, no active feeding | As needed only | Only if damage appears |
Best Time of Day:
- Best: Early morning (6-9 AM) or late afternoon (4-7 PM)
- Why: Chinch bugs most active during cooler parts of day
- Avoid: Midday heat (chinch bugs deeper in thatch, harder to detect)
After Irrigation/Rain:
- Wait: 24-48 hours after heavy watering
- Why: Chinch bugs move deeper when thatch is wet
- Exception: Light dew or morning irrigation is fine
Where to Monitor: Strategic Scouting
Don't test randomly. Chinch bugs follow predictable patterns.
Priority Zone 1: Hot Spots (Test these FIRST)
- South-facing areas (most sun exposure)
- West-facing areas (afternoon heat)
- Next to driveways, sidewalks, streets (radiated heat)
- Along building foundations (reflected heat)
- Slopes with good drainage (drier soil)
Priority Zone 2: Drought-Prone Areas
- High spots in lawn (water drains away)
- Sandy soil sections (dries faster)
- Areas under roof overhangs (less rain/irrigation)
- Spots with poor irrigation coverage
Priority Zone 3: Previous Damage Sites
- Locations where chinch bugs appeared last year
- Areas that required treatment previously
- Historical "problem spots"
Low-Risk Areas (Test only if high-risk areas are clear)
- Shaded areas under trees
- Low spots with good moisture
- North-facing exposures
- Recently irrigated sections
Sampling Pattern for 5,000 sq ft lawn:
- Test 4-6 locations minimum
- Focus on hot spots and transition zones
- If any location shows 15+ chinch bugs, expand testing
- Map results to track population movement
💡 PRO TIP: I use smartphone photos to document test locations. Take a picture of where you did the float test, note the count, date-stamp it. After a few weeks you'll see patterns emerge—chinch bugs move from the same starting points each year.
Treatment Thresholds
How many chinch bugs justify treatment?
| Chinch Bugs Found | Population Density | Action Required |
|---|---|---|
| 0-10 per can | <100 per sq ft | Monitor weekly, no treatment yet |
| 10-20 per can | 100-200 per sq ft | Prepare to treat, test again in 3-5 days |
| 20-40 per can | 200-400 per sq ft | TREAT IMMEDIATELY |
| 40+ per can | 400+ per sq ft | SEVERE - treat + address underlying issues |
Conservative Approach (Recommended for valuable lawns)
- Treat at 15+ chinch bugs per can
- Better to treat early than watch lawn die
- Insecticide applications are cheaper than sod replacement
Special Circumstances - Adjust Thresholds:
During Drought Conditions:
- Lower threshold to 10-15 per can
- Grass already stressed, less able to tolerate feeding damage
- Chinch bugs multiply faster in drought
Newly Installed Lawns (First Year):
- Treat at 5-10 per can
- Young grass cannot tolerate much damage
- Investment protection
High-Value Areas (Front Yard, Entryway):
- Treat at 10-15 per can
- Aesthetic importance justifies preventive action
Record Keeping & Population Tracking
Why track populations? Chinch bug outbreaks follow patterns. Lawns that had chinch bugs in June 2024 will likely have them in June 2025—starting from the same locations.
Simple Tracking System:
Create a lawn map:
- Sketch basic outline of property
- Mark north direction
- Label features (driveway, walkway, building)
- Divide into zones (A, B, C, etc.)
Record test results:
- Date
- Zone tested
- Number of adults
- Number of nymphs
- Weather conditions (temp, recent rain)
- Treatment action taken (if any)
Sample Log Entry:
Date: June 15, 2025
Zone: A (South side, near driveway)
Count: 23 adults, 31 nymphs (54 total)
Temp: 89°F, no rain in 8 days
Action: Applied bifenthrin 0.25% at label rate
Follow-up test: Scheduled June 22
💡 PRO TIP: I keep a simple spreadsheet with columns for Date, Zone, Count, and Action. Takes 2 minutes to update after each test. At the end of the season, I can see exactly when and where chinch bugs appeared, and whether treatments worked.
Post-Treatment Monitoring
You treated for chinch bugs. Great. Now what?
| Timeline | What to Do | Expected Results |
|---|---|---|
| Days 1-3 After Treatment | Don't test yet - insecticide needs time to work | Chinch bugs may still be alive but dying |
| Days 5-7 After Treatment | First follow-up test - same locations as original tests | 80-95% reduction in population |
| Days 14-16 After Treatment | Second follow-up test | Should see near-zero chinch bugs |
| Weeks 3-8 After Treatment | Resume normal monitoring - weekly tests during peak season | Watch for reinfestation from untreated areas |
Treatment Failure Indicators (Week 1 post-treatment):
- Still finding 15+ chinch bugs per can
- Damage continuing to spread
- Grass not recovering
Possible causes:
- Insecticide resistance
- Insufficient coverage
- Application error (wrong rate, not watered in)
- Reinfestation from neighboring lawns
The Monitoring Bottom Line
Early detection = easy control.
| Early Infestation (15 per sq ft) | Severe Outbreak (300 per sq ft) | |
|---|---|---|
| Treatment needed | 1 insecticide application | Multiple insecticide applications |
| Grass damage | Limited | Extensive (30-50% loss common) |
| Recovery | 2-3 weeks | Requires re-sodding |
| Cost | $30-50 in materials | $1,500-3,000+ for replacement |
Your choice: Spend 10 minutes per week doing float tests, or spend thousands replacing dead grass.
Part 3: Chinch Bug Control Strategies
Chemical Control Done Right
Let's be direct: When you have an active chinch bug infestation above treatment threshold, you need insecticide. Period.
I've watched homeowners try every "natural" remedy imaginable: soap sprays, diatomaceous earth, beneficial nematodes, garlic spray, "waiting for predators." None work reliably. Your lawn will be dead first.
The good news: Modern insecticides for chinch bugs are highly effective, relatively safe when used correctly, and affordable.
The bad news: Resistance is emerging, application timing is critical, and improper use causes environmental harm.
Active Ingredients for Chinch Bugs
Tier 1: Most Effective (First Choice)
Bifenthrin
- Class: Pyrethroid
- Brand names: Talstar, Bifen I/T (check price →), Up-Star
- Mode of action: Contact + some residual (3-4 weeks)
- Application rate: 0.125-0.25 lbs AI per acre
- Cost: $25-40 per 5,000 sq ft treatment
Why I recommend it: Fast knockdown (chinch bugs die in 24-48 hours), long residual, broad spectrum (kills multiple pests), affordable.
Downsides: Toxic to aquatic life (don't let runoff enter waterways), can kill beneficial insects.
Lambda-Cyhalothrin
- Class: Pyrethroid
- Brand names: Demand, Warrior, Cyonara
- Mode of action: Contact, 3-4 week residual
- Application rate: 0.03-0.06 lbs AI per acre
- Cost: $30-50 per 5,000 sq ft
Very similar to bifenthrin in effectiveness. Slightly faster knockdown, slightly shorter residual.
Tier 2: Good Alternatives
Carbaryl
- Class: Carbamate
- Brand names: Sevin
- Mode of action: Contact + ingestion
- Residual: 2-3 weeks
- Cost: $20-35 per 5,000 sq ft
Pros: Widely available, effective, also controls grubs and other pests
Cons: Shorter residual than pyrethroids, more toxic to bees
Permethrin
- Class: Pyrethroid
- Residual: 2-4 weeks
- Cost: $25-40 per 5,000 sq ft
Similar to bifenthrin but generally less effective. Good backup option.
Tier 3: Systemic Options (Different Approach)
Imidacloprid
- Class: Neonicotinoid (systemic)
- Brand names: Merit, Bayer Advanced
- Mode of action: Absorbed by plant, kills insects feeding on it
- Residual: 8-12 weeks
- Cost: $40-60 per 5,000 sq ft
How it works: Grass absorbs insecticide through roots, moves it into leaves. Chinch bugs feed on treated grass and die.
Pros: Long residual, doesn't kill surface beneficial insects, rain doesn't wash it away
Cons: Takes 7-14 days to work (too slow for severe infestations), bee toxicity concerns
Best use: Preventive applications in April-May before chinch bugs appear, not for active infestations.
Clothianidin
- Class: Neonicotinoid (systemic)
- Brand names: Arena
- Similar to imidacloprid
Tier 4: Don't Bother
- Pyrethrins (natural): Breaks down in sunlight within hours, needs constant reapplication, expensive
- Insecticidal soap: Only kills on direct contact, no residual, chinch bugs in thatch are protected
- Essential oils (various): Marketing hype, minimal efficacy, extremely short residual if any
Application Timing: When to Spray
Timing is everything. The best insecticide applied at the wrong time will fail.
Curative Treatment (Active Infestation)
When: As soon as float test confirms treatment threshold populations (15-20+ per can)
Best time of day: Late afternoon/evening (4-7 PM)
- Why: Chinch bugs move up into grass canopy to feed in afternoon
- Insecticide contacts more bugs when they're exposed
- Less sun degradation of chemical overnight
Weather requirements:
- Temperature: 65-85°F ideal
- Wind: <10 mph
- Rain: None forecasted for 24 hours minimum
- Drought: Actually helps—chinch bugs concentrated in active feeding areas
💡 PRO TIP: Apply insecticide in late afternoon, water it in lightly (0.25 inches) immediately after application. This washes chemical into thatch layer where chinch bugs live and prevents it from degrading in sunlight.
Preventive Treatment (Before Infestation)
Timing: April-May (before first generation nymphs appear)
Best products: Systemic insecticides (imidacloprid, clothianidin)
- Apply in April
- Water in thoroughly (0.5 inches)
- Provides protection through July-August
Who should use preventive treatment:
- Lawns with severe chinch bug history
- Properties that had >$500 damage last year
- Situations where monitoring is impractical (vacation homes, etc.)
Cost-benefit analysis:
- Preventive treatment: $50-80 per application, once per year
- Curative treatment: $30-50 per application, 2-4x per year often needed
- Lawn replacement: $1,500-3,000
Application Techniques
| Equipment | Pros | Cons | Best For |
|---|---|---|---|
| Hose-End Sprayer | Simple, affordable ($15-30), no mixing | Less accurate coverage, uses more product | Small lawns (<3,000 sq ft) |
| Pump Sprayer (1-4 gallon) | Precise control, even coverage, professional results | Labor-intensive for large areas, need to mix | Medium lawns (3,000-7,000 sq ft) |
| Backpack Sprayer | Large capacity, professional-grade, efficient | Expensive ($100-300), overkill for small lawns | Large lawns (>7,000 sq ft) |
| Granular Spreader | Easy, no mixing, can combine with fertilizer | Must be watered in immediately, less effective | Preventive applications |
Application Coverage:
Step 1: Calculate treatment area
- Measure lawn square footage
- Add 20% buffer for overlap and edges
- Example: 5,000 sq ft lawn = treat 6,000 sq ft
Step 2: Mix product to label rate
- READ THE LABEL
- Most liquid concentrates: 0.5-1 oz per gallon of water per 1,000 sq ft
- Mix in clean sprayer tank, shake well
Step 3: Apply evenly
- Walk at consistent pace (3 mph = comfortable walk)
- Overlap spray swaths by 50%
- Treat entire lawn, not just damaged areas (chinch bugs spread)
Step 4: Water in (critical)
- Apply 0.25-0.5 inches water immediately after spraying
- Use irrigation system or hose with sprinkler
- Moves insecticide into thatch layer
⚠️ COMMON MISTAKE: Spraying only the damaged areas. Chinch bugs are mobile—they've already spread to surrounding grass. Treat the entire lawn or you'll have new damage in untreated areas within 2-3 weeks.
Resistance Management
Bad news: Chinch bug resistance to pyrethroids (bifenthrin, permethrin) is emerging in some areas.
Signs of resistance:
- Treatment with bifenthrin at label rate doesn't reduce populations
- Chinch bugs still active 7-10 days after application
- Repeated treatments needed every 3-4 weeks
Where resistance is documented:
- Parts of Florida (Tampa, Jacksonville, Orlando areas)
- Coastal Texas (Houston region)
- Southern Louisiana
Resistance Management Strategy:
Rotate insecticide classes annually:
- Year 1: Pyrethroid (bifenthrin)
- Year 2: Carbamate (carbaryl)
- Year 3: Neonicotinoid (imidacloprid)
- Year 4: Back to pyrethroid
Never use the same active ingredient for consecutive treatments within a single season.
Example treatment schedule:
- May: Imidacloprid (systemic preventive)
- July: Bifenthrin (curative if needed)
- September: Carbaryl (if second treatment needed)
This rotation prevents resistant populations from dominating.
Spot Treatment vs Broadcast
Do you need to treat the entire lawn?
| Broadcast Treatment (Entire Lawn) | Spot Treatment (Damaged Areas Only) | |
|---|---|---|
| When to use |
• Multiple areas showing damage • Float test finds bugs in 3+ locations • History of recurring infestations • Preventive application |
• Single isolated damaged patch • First detection of season • Small lawn with visible damage concentration |
| Pros | Complete coverage, prevents spread | Lower cost, reduced chemical use |
| Cons | Higher cost, more chemical use, kills beneficial insects | Risk of chinch bugs moving to untreated areas |
| Cost | $40-80 per 5,000 sq ft | $10-20 per treatment |
Spot Treatment Technique:
- Treat damaged area + 10-foot buffer around it
- Monitor untreated areas weekly
- Be prepared to expand treatment
💡 PRO TIP: I recommend broadcast treatment for first application of the season. It eliminates ALL chinch bugs, giving you a clean slate. Later in season, spot treatments can work if you catch infestations very early.
Safety & Environmental Considerations
These are pesticides. Used incorrectly, they can harm people, pets, and the environment.
Personal Safety
During Application:
- Wear long pants, long sleeves, closed-toe shoes
- Use chemical-resistant gloves
- Avoid breathing spray mist
- Wash hands thoroughly after handling
After Application:
- Keep people and pets off lawn until spray dries (usually 2-4 hours)
- Granular products: keep off until watered in and dried
- Wait 24 hours before allowing children/pets on treated lawn
Environmental Protection
Aquatic Life:
- Pyrethroids are extremely toxic to fish and aquatic invertebrates
- NEVER allow runoff into storm drains, ponds, streams
- Don't spray if heavy rain is forecasted within 24 hours
- Leave untreated buffer zones near water bodies
Pollinators:
- Apply in late afternoon/evening when bees are not active
- Avoid spraying flowering plants (clover, weeds)
- Systemic neonicotinoids have bee toxicity concerns—use judiciously
Beneficial Insects:
- Pyrethroids kill beneficial predatory insects (spiders, ground beetles, etc.)
- This is unavoidable but minimize by using lowest effective rate
What to Expect After Treatment
| Timeline | What Happens |
|---|---|
| Hours 1-24 |
• Chinch bugs die or become lethargic • May see increased insect activity (trying to escape) • Grass damage continues to appear (delayed symptom from earlier feeding) |
| Days 2-5 |
• 80-95% of chinch bugs dead • Float test should show dramatic population reduction • Damaged grass still brown (takes weeks to recover) |
| Days 7-14 |
• Near-complete elimination if treatment worked • Grass begins recovery in less-damaged areas • Severely damaged areas may be dead permanently |
| Weeks 3-6 |
• Monitor for reinfestation • Grass continues recovery • May need fertilizer + irrigation to speed recovery |
⚠️ COMMON MISTAKE: Expecting grass to turn green immediately after treatment. Insecticides kill chinch bugs but don't repair damage. Dead grass is dead. Treatment prevents FURTHER damage and allows recovery in areas that aren't too far gone.
The Control Bottom Line
Effective chinch bug control requires:
- Early detection (monitoring with float test)
- Correct product selection (bifenthrin, lambda-cyhalothrin, or carbaryl for active infestations)
- Proper timing (late afternoon application)
- Complete coverage (treat entire lawn, not just spots)
- Watering in (0.25-0.5 inches immediately after)
- Follow-up monitoring (test again in 7 days)
Do all six correctly and you'll have >90% control with single application.
Skip any step and you'll be treating again in 3 weeks wondering why it didn't work.
Part 4: Chinch Bug Prevention Programs
The Best Treatment is No Treatment
Here's what I tell every new St. Augustine customer: "You can spend $50-100 per year on insecticides treating chinch bugs reactively, or you can invest in prevention and rarely need to spray at all."
The homeowners who follow prevention programs:
- Spray insecticides 70-80% less often
- Have minimal chinch bug damage
- Save money long-term
- Maintain healthier lawns with fewer chemical inputs
The homeowners who ignore prevention:
- Spray 3-5 times per summer
- Fight recurring infestations
- Spend thousands on sod replacement
- Create insecticide-resistant chinch bug populations
Cultural Practice Prevention
The foundation of chinch bug prevention is creating conditions where chinch bugs cannot thrive.
Irrigation Management: The #1 Prevention Tool
Remember: Chinch bugs prefer hot, dry conditions. Consistently moist (not wet) turf is naturally resistant.
Preventive Irrigation Program:
During Chinch Bug Season (May-September):
- Frequency: 2x per week minimum (3x during heat waves)
- Duration: 0.75-1 inch per application
- Timing: Early morning (4-7 AM)
- Goal: Maintain consistent soil moisture, avoid drought stress cycles
Why this works:
- Chinch bugs avoid wet grass (interferes with movement and feeding)
- Well-hydrated grass tolerates feeding damage better
- Consistent moisture = consistent grass growth = ability to outgrow minor damage
Hot Spot Management:
- South/west-facing areas: Add 3rd weekly irrigation
- Near pavement/driveways: Hand-water 2-3x per week
- High drainage areas: Increase duration by 25%
⚠️ CRITICAL: Don't confuse "consistently moist" with "overwatering." You want moist soil to 4-6 inches deep, not standing water. Overwatering causes disease problems (brown patch especially).
💡 PRO TIP: I set irrigation controllers to run every 3-4 days during chinch bug season instead of the standard twice-weekly. This provides more consistent moisture and dramatically reduces chinch bug pressure.
Mowing Height and Frequency
Taller grass = better chinch bug resistance.
Preventive Mowing Heights:
- Common St. Augustine: 3-3.5 inches
- Dwarf cultivars (Seville, DelMar): 2.5-3 inches
- Shade areas: Add 0.5 inches to above heights
Why taller is better:
- Creates denser canopy that shades soil/thatch (cooler microclimate)
- Reduces soil temperature by 5-10°F (less favorable for chinch bugs)
- Deeper root system = better drought tolerance
- More leaf area = grass can better tolerate feeding damage
Mowing Frequency:
- Growing season: Weekly (or when grass reaches 4-5 inches)
- Never remove more than 1/3 of grass height per mowing
- Blade sharpness: Sharp blades essential (dull blades stress grass)
Stress from scalping = chinch bug invitation. Grass cut too short (2 inches or less) is dramatically more susceptible.
Fertilization Strategy
The fertilization paradox:
- Too much nitrogen = lush succulent growth = chinch bug attractant
- Too little nitrogen = thin weak grass = cannot tolerate feeding damage
Balanced Approach:
Annual Nitrogen Totals:
- Maximum: 4-5 lbs N per 1,000 sq ft per year
- Optimal for chinch bug prevention: 3-4 lbs N per 1,000 sq ft per year
- Minimum: 2-3 lbs (below this, grass is too weak)
Application Timing:
- Split into 4-6 applications rather than heavy single doses
- Rate: 0.5-0.75 lbs N per 1,000 sq ft per application
- Frequency: Every 6-8 weeks during growing season
Slow-Release Nitrogen:
- Use 50-100% slow-release formulations
- Provides steady nutrition without flushes of succulent growth
- Examples: Milorganite, coated urea, polymer-coated fertilizers
Avoid:
- Single heavy spring application (2+ lbs N at once)
- Fast-release nitrogen during peak chinch bug season (June-August)
- Fertilizing drought-stressed lawns
💡 PRO TIP: I've noticed lawns receiving 3.5 lbs N per year in 6 split applications have 60-70% less chinch bug damage compared to lawns getting 5+ lbs in 3-4 heavy doses. Slow and steady wins.
Thatch Management
Thick thatch is chinch bug headquarters. This cannot be overstated.
Thatch Measurement:
- Use soil probe or large screwdriver
- Push into turf until you hit soil
- Pull out and examine
- Measure spongy brown layer above soil
| Thickness | Rating | Action Required |
|---|---|---|
| <0.5 inches | Acceptable, beneficial | None - provides cushion, insulation |
| 0.5-0.75 inches | Acceptable but monitor | Watch closely, prevent further buildup |
| 0.75-1 inch | PROBLEM | Begin reduction program (aeration + top-dressing) |
| >1 inch | SEVERE PROBLEM | Immediate action required - verticutting needed |
Why thatch favors chinch bugs:
- Provides insulated microhabitat (warmer temperatures)
- Protects from predators and weather
- Egg-laying sites
- Nymph development habitat
- Shelter from insecticides
Lawns with >1 inch thatch have 3-5x higher chinch bug populations than lawns with <0.5 inches.
Thatch Reduction Methods
Method #1: Vertical Mowing (Verticutting)
What it is: Machine with vertical blades that slice through thatch
When to do it:
- Best time: May or early June (active growth period)
- Frequency: Every 2-3 years if thatch >0.75 inches
- NOT during: Summer heat, drought, or winter dormancy
Procedure:
- Mow lawn to 2-2.5 inches (lower than normal)
- Verticut in two directions (north-south, then east-west)
- Rake up and remove thatch debris (don't leave on lawn)
- Fertilize lightly (0.5 lb N per 1,000 sq ft)
- Irrigate heavily (1 inch)
- Resume normal mowing in 2-3 weeks
Results:
- Removes 40-60% of thatch layer
- Lawn looks terrible for 2-3 weeks (brown, thin)
- Recovers to dense growth in 4-6 weeks
- Chinch bug populations decline dramatically
Cost: $150-300 professional service for 5,000 sq ft, or rent machine for $75-100/day
Method #2: Core Aeration
What it is: Machine pulls plugs of soil, creating holes in thatch/soil
When to do it:
- Best time: May-June (St. Augustine actively growing)
- Frequency: Annually for thatch-prone lawns
- Equipment: Core aerator (not spike aerator)
Procedure:
- Irrigate day before (moist soil, not wet)
- Make 2-3 passes in different directions
- Leave cores on surface to decompose (or rake up if aesthetics matter)
- Top-dress with compost if desired (0.25-0.5 inch layer)
- Fertilize lightly
Results:
- Doesn't remove thatch directly but increases decomposition
- Improves water/air infiltration through thatch
- Long-term thatch reduction (10-20% per year)
- Less traumatic than verticutting
Cost: $100-200 professional service for 5,000 sq ft
Method #3: Biological Decomposition
What it is: Encourage natural thatch breakdown by microorganisms
How:
- Maintain soil moisture (decomposition requires moisture)
- Add organic matter via top-dressing (1/4 inch compost annually)
- Use organic fertilizers (Milorganite, composted manure) that feed soil biology
- Avoid excessive pesticide/fungicide use (kills beneficial microbes)
Results:
- Slow process (years, not weeks)
- Sustainable long-term solution
- Requires no equipment
Best used in combination with mechanical removal, not as sole method.
⚠️ COMMON MISTAKE: Dethatching in July-August during peak chinch bug season. This stresses grass severely, and stressed grass cannot tolerate chinch bug feeding. ALWAYS dethatch during active growth period (May-June) when grass can recover quickly.
Preventive Insecticide Programs (Optional)
For lawns with severe chinch bug history, preventive insecticide applications can break the cycle.
Systemic Preventive Program
- Product: Imidacloprid (Merit) or Clothianidin (Arena)
- Timing: April (before first chinch bug generation)
- Rate: Label rate for preventive application (usually 0.5 lbs AI per acre)
Application:
- Apply granular or liquid formulation
- Water in thoroughly (0.5-1 inch)
- Chemical absorbed by roots, moves into grass tissue
- Lasts 8-12 weeks
Cost: $50-80 for 5,000 sq ft
Results:
- 70-90% reduction in chinch bug populations
- Eliminates need for curative treatments
- Single application per year
Who should use this:
- Lawns with chinch bug damage 3+ years in row
- Properties where monitoring is impractical
- High-value lawns where any damage is unacceptable
Downsides:
- Pollinator toxicity concerns
- Doesn't eliminate need for monitoring
- Can create false sense of security
Cost Comparison: Prevention vs Reactive Treatment
| Approach | Annual Cost | Treatments Needed | Lawn Damage |
|---|---|---|---|
| Preventive Program (Cultural Practices Only) | ~$100/year (verticutting every 3 years average) | 0-1 per year | Minimal |
| Preventive Program (Cultural + Systemic Insecticide) | $160/year (cultural $100 + imidacloprid $60) | 0 per year | Minimal |
| Reactive Treatment Only | $120-200/year average (3-5 treatments @ $40 each + occasional sod replacement $500 every 3-4 years) | 3-5 per year | Moderate to Severe |
💡 PRO TIP: Prevention is cheaper, less work, and produces better results. The only reason to skip prevention is if you enjoy spending money on insecticides and replacing dead grass.
Resistant Cultivar Selection (The Truth)
The bad news: No truly chinch bug-resistant St. Augustine cultivars exist anymore.
The history:
- Floratam was resistant when released (1970s-1990s)
- Resistance has been broken in most regions (chinch bugs adapted)
- No new resistant cultivars have been developed
Current Cultivar Comparison:
| Slightly Better Than Average | Captiva (shows some tolerance in Florida trials) Bitterblue (performs better in Texas) CitraBlue (limited data, promising) |
| Average Susceptibility | Palmetto, Seville, Raleigh, Classic |
| Highly Susceptible | Floratam (resistance broken) |
Bottom line: Don't select cultivar based on chinch bug resistance. Choose based on shade tolerance, cold hardiness, and texture. Then implement prevention program regardless of cultivar.
Integrated Pest Management (IPM) Approach
IPM = Using multiple tactics to keep pests below economic damage threshold
Tier 1: Cultural Controls (Foundation)
- Consistent irrigation (2-3x per week May-September)
- Proper mowing height (3-3.5 inches)
- Balanced fertility (3-4 lbs N per year, split applications)
- Annual aeration
- Thatch management (keep <0.75 inches)
Tier 2: Monitoring (Early Warning)
- Weekly float tests during peak season
- Document hot spots and patterns
- Track populations vs treatment thresholds
- Identify stress conditions (drought, over-fertilization)
Tier 3: Targeted Treatment (As Needed)
- Treat only when populations exceed threshold (15-20+ per can)
- Use spot treatments when possible
- Apply at optimal time (late afternoon)
- Water in properly
- Follow up with monitoring
Tier 4: Preventive Chemistry (If Needed)
- Systemic preventive only for severe-history lawns
- Rotate insecticide classes
- Use lowest effective rates
- Time applications precisely
IPM Success Metrics:
- <2 insecticide applications per year
- <5% lawn area damaged annually
- No recurring infestations in same spots
- Healthy dense turf
Seasonal Prevention Calendar
Use this annual schedule:
MARCH-APRIL (Pre-Season Prep)
- ☐ Inspect thatch depth (plan verticutting if >0.75 inches)
- ☐ Review last year's chinch bug records
- ☐ Calibrate irrigation system for summer
- ☐ Apply first fertilizer application (0.5-0.75 lb N)
- ☐ OPTIONAL: Apply imidacloprid preventive if severe history
MAY (Early Season Monitoring)
- ☐ Begin weekly float test monitoring
- ☐ Verticut if needed (do NOT delay past May)
- ☐ Core aerate
- ☐ Increase irrigation to 2x per week
- ☐ Second fertilizer application
JUNE-JULY (Peak Season Vigilance)
- ☐ Continue weekly float tests
- ☐ Treat immediately if threshold exceeded
- ☐ Monitor stress conditions (drought, heat waves)
- ☐ Hand-water hot spots
- ☐ Third fertilizer application (early June)
AUGUST-SEPTEMBER (Late Season)
- ☐ Continue monitoring (populations often peak in September)
- ☐ Treat if needed
- ☐ Fourth fertilizer application (August if needed)
- ☐ Document damage and treatment locations for next year
OCTOBER-FEBRUARY (Off-Season)
- ☐ Reduce irrigation frequency
- ☐ No fertilizer needed (dormant/slow growth)
- ☐ Plan next year's prevention program
- ☐ Budget for verticutting equipment rental or service
The Prevention Bottom Line
Chinch bugs are manageable if you commit to prevention.
Three-part prevention program:
- Cultural practices - Proper irrigation, mowing, fertility, thatch management
- Monitoring - Weekly float tests May-September
- Targeted treatment - Quick response when thresholds exceeded
| With Prevention Program | Without Prevention | |
|---|---|---|
| Chinch bug damage | 80-90% less | Recurring every summer |
| Insecticide applications | 70-80% fewer | 3-5+ per year |
| Annual cost | $100-160/year | $200-500/year |
| Lawn health | Healthier, denser | Stressed, patchy |
Your choice. Prevention takes discipline and consistency, but it works.
Reactive treatment is easier short-term but costs more and produces worse results long-term.
I know which option my most successful customers choose.
Chinch Bug Management: Complete Summary
Essential Takeaways
- Expect chinch bugs if you grow St. Augustine in zones 8-11—it's not if, but when
- Weekly float tests May-September are your early warning system—10 minutes that can save thousands
- Treatment threshold: 20+ bugs per can requires immediate action with proper insecticide
- Prevention is 80% of success: Consistent irrigation + proper mowing + thatch management + balanced fertility
- Early detection = easy control: Catching problems at 15 per sq ft vs 300 per sq ft is the difference between $30 and $3,000
- Rotate insecticide classes to prevent resistance (pyrethroids → carbamates → neonicotinoids → repeat)
- Cultural practices beat chemistry: Well-managed lawns need 70-80% fewer insecticide applications
The Success Formula
Weekly Monitoring + Consistent Irrigation + Thatch Management + Balanced Fertility = Minimal Chinch Bug Damage
This isn't complicated, but it requires vigilance. The homeowners with the best-looking St. Augustine lawns in Florida, Texas, Louisiana, and California aren't lucky—they're monitoring and managing proactively.
You now have the complete knowledge to succeed. Execute these strategies and chinch bugs become a manageable minor issue instead of a lawn-destroying catastrophe.
Major St. Augustine Diseases: Prevention & Control
St. Augustine faces three major fungal diseases. Brown Patch is the #1 disease problem (spring/fall), Gray Leaf Spot causes summer defoliation (but grass recovers), and Take-All Root Rot is a slow progressive root disease with no cure.
Good news: Cultural practices prevent 80-90% of disease problems. Fix irrigation timing, manage nitrogen properly, and maintain proper pH.
Disease Quick Reference
| Disease | Season | Speed | Key Symptom | Prevention Priority |
|---|---|---|---|---|
| Brown Patch | Spring/Fall | Fast (days) | Circular 2-4 ft patches with "smoke ring" in dew | Morning watering + low N |
| Gray Leaf Spot | Summer | Moderate (weeks) | Leaf lesions, severe defoliation (recovers naturally) | Low summer N + resistant cultivars |
| Take-All Root Rot | Year-round | Slow (months) | Blackened short roots, slow decline (no cure) | pH 6.0-6.5 + drainage |
Brown Patch (*Rhizoctonia solani*)
The #1 disease problem for St. Augustine. Can destroy 30-40% of lawn in 10 days during perfect conditions (mild temps 68-85°F, high humidity, overnight dew). Most common in spring (April-May) and fall (October-November).
How to Identify
- Circular patches 2-4+ feet diameter
- "Smoke ring": Dark gray/purple ring of wilted grass at edge (visible in morning dew) - DIAGNOSTIC
- Timing: Mild weather (not summer heat)
- Recovery: Center recovers creating "doughnut" pattern
Prevention (Most Important)
1. Nitrogen Management
Spring: Max 0.5 lb N per 1,000 sq ft, slow-release only
Avoid: Heavy applications in April-May
During outbreak: DO NOT fertilize
2. Irrigation Timing
Water 4-7 AM (grass dries by 9-10 AM)
NEVER water evening → grass wet overnight = disease
During outbreak: Reduce 25-30%
3. Air Circulation
Prune tree branches, thin canopy
Bag clippings during outbreak
Maintain thatch <0.75 inches
Fungicide Treatment (If Prevention Fails)
| Product | Effectiveness | Cost/5k sqft | Application Timing |
|---|---|---|---|
| Heritage Action, Headway (Azox + Prop) | ⭐⭐⭐⭐⭐ | $50-80 | Preventive: April, May, Oct |
| Banner Maxx (Propiconazole) | ⭐⭐⭐⭐ | $30-50 | Curative: At first symptoms |
Preventive program cost: $100-200/year for 85-95% reduction in damage
Gray Leaf Spot (*Pyricularia grisea*)
Summer defoliation disease. Kills leaf blades but usually not crowns—grass often recovers naturally when weather cools. Most active June-September during hot humid weather (75-95°F, >90% humidity).
How to Identify
- Leaf lesions: Small tan spots with dark borders, "hourglass" shape
- Severe infection: Lawn appears scalped (70-90% defoliation possible)
- Key feature: Stolons remain green even when leaves are dead
- Recovery: New leaves emerge in 4-6 weeks after conditions change
Cultivar Susceptibility
Highly Susceptible: Floratam, Classic
Moderate Resistance: Palmetto, Captiva
Best choice for gray leaf spot areas: Palmetto when installing new lawn
Prevention Strategy
1. Summer Nitrogen Mgmt (CRITICAL)
June-August: Max 0.5-0.75 lb N per application
Type: Slow-release ONLY
Avoid: Fast-release during rainy periods
During outbreak: STOP fertilizing for 3-4 weeks
2. Mowing Management
Height: 3-3.5 inches (NEVER scalp)
Bag clippings during outbreak (removes spores)
Sharp blades: Clean cuts heal faster
3. Reduce Leaf Wetness
Water early morning (4-7 AM)
Skip scheduled irrigation after rain
Prune trees to improve air circulation
Natural Recovery (The Good News)
St. Augustine recovers from gray leaf spot naturally. Unlike brown patch (kills at crown), gray leaf spot only kills leaves.
Weeks 1-3: Looks terrible (thin, defoliated), but stolons/crowns alive
Weeks 4-6: New leaves emerging, grass filling in
Weeks 7-12: 70-80% recovery. May take full season for 100%
Support recovery: Light fertilization (0.5 lb N) in September, consistent moisture
Fungicide Options (Severe Cases)
| Product | Effectiveness | Cost/5k sqft | Program |
|---|---|---|---|
| Heritage (Azoxystrobin) | ⭐⭐⭐⭐⭐ | $40-70 | Late May, Mid-July, Late Aug |
| Headway (Azox + Prop) | ⭐⭐⭐⭐⭐ | $50-80 | Broad spectrum option |
Preventive program cost: $120-240/season for 80-95% reduction in defoliation
Take-All Root Rot (*Gaeumannomyces graminis*)
The slow progressive decline disease. Attacks roots exclusively over 6-18 months. No cure exists—management focuses on slowing progression and helping grass compensate.
How to Identify (Root Diagnosis Required)
✅ Healthy Roots:
- White or light tan color
- 4-8 inches long
- Numerous fine root hairs
- Firm texture
❌ TARR-Infected Roots:
- Dark brown to black lesions
- Very short (1-2 inches or less)
- Few or no root hairs
- Mushy, break easily
- Rotten smell when crushed
Above-Ground Symptoms (Slow Progression)
- Months 1-3: Small yellowing patches, doesn't respond to fertilization
- Months 3-9: Patches expand slowly (inches/month), 50-80% thinning, weeds invade
- Months 9-18: Large dead areas, cycle repeats in new areas
Conditions Favoring TARR
⚠️ CRITICAL FACTOR: Alkaline soil (pH >7.0) - Most common in coastal areas with limestone, shell, or alkaline irrigation water. Rare in acidic soils.
Other factors: Poor drainage, compacted soil, high sodium (coastal/salt spray), stressed grass (new sod most vulnerable)
Management Strategies (No Cure)
1. Soil pH Modification (MOST IMPORTANT)
Goal: Lower pH to 6.0-6.5
Method: Sulfur at 5-10 lbs per 1,000 sq ft (based on soil test)
Testing: Test before and after, retest every 6 months
Reality: Difficult to maintain in alkaline environments, but critical for slowing disease
2. Improve Drainage
Core aerate 2-3x per year, fix low spots, reduce irrigation frequency, top-dress with sand in clay soils
3. Fertilization Adjustments
Nitrogen: Reduce to 2-3 lbs N/year, slow-release only
Iron: Monthly chelated iron (greens grass despite root damage) - cosmetic only
Calcium: Gypsum 5-10 lbs per 1,000 sq ft spring/fall
4. Fungicides (Limited Effectiveness)
Azoxystrobin (Heritage): Some suppression, $50-80/month, may slow but won't stop
Reality: Expensive, variable results, worth trying but not cure
Long-Term Outlook
Best case: pH lowered, drainage improved → disease slows or stops, lawn maintains acceptable appearance with ongoing management (1-2 years to stabilize)
Moderate case: Some improvement but slow decline continues → renovation in 3-5 years
Worst case: Alkaline conditions can't be fixed → renovation within 1-2 years, consider different grass species (Bermuda, Zoysia)
⚠️ If renovating with St. Augustine again: MUST fix pH and drainage first or problem repeats. If pH stays >7.0 despite sulfur, consider alternative grass species that tolerate alkaline soil better.
Your Disease Prevention Action Plan
- Test soil pH → If >7.0, apply sulfur immediately (prevents take-all root rot long-term)
- Fix irrigation timing → Early morning ONLY (4-7 AM), never evening (prevents brown patch + gray leaf spot)
- Manage nitrogen properly → Max 0.5-0.75 lb N per application, slow-release only (prevents all three diseases)
- Improve drainage → Core aerate, fix low spots, reduce frequency (prevents brown patch + take-all)
- Choose resistant cultivars → Palmetto over Floratam when possible (reduces gray leaf spot)
- Monitor for symptoms → Early detection = easier control for brown patch and gray leaf spot
Bottom line: Cultural practices prevent 80-90% of disease problems. Irrigation timing, nitrogen management, pH correction, and drainage improvement are your primary defenses. Fungicides are backup tools for when prevention fails, not the primary strategy.
St. Augustine Weed Control: Safe & Effective Strategies
Critical reality: St. Augustine is more herbicide-sensitive than Bermuda or Zoysia. Many common lawn herbicides will severely damage or kill St. Augustine grass. You MUST use St. Augustine-safe products.
The best weed control: A thick, healthy St. Augustine lawn naturally crowds out most weeds. Proper fertility, irrigation, and mowing height (3-4 inches) prevent 70-80% of weed problems.
⚠️ NEVER Use These on St. Augustine
- Dicamba - Will severely injure or kill St. Augustine
- 2,4-DP (dichlorprop) - Not safe for St. Augustine
- MSMA, DSMA - Arsenic-based, damages St. Augustine
- Most "Weed & Feed" products - Usually contain unsafe herbicides for St. Augustine
- Broadleaf weed killers for "all lawns" - Read labels carefully, most aren't St. Augustine-safe
ALWAYS read labels and confirm product is labeled safe for St. Augustine before application.
St. Augustine-Safe Herbicides
Pre-Emergent Herbicides (Prevent Weed Seeds from Germinating)
| Product/Active Ingredient | Controls | Timing | St. Augustine Safety |
|---|---|---|---|
| Prodiamine (Barricade, many generics) | Crabgrass, goosegrass, annual bluegrass, many broadleaf weeds | Feb-March (before soil 55°F), Sept (fall application) | ✅ Safe, industry standard |
| Dithiopyr (Dimension) | Crabgrass, goosegrass (limited post-emergent on young crabgrass) | Feb-March, can apply slightly later than prodiamine | ✅ Safe |
| Pendimethalin (Pre-M, Pendulum) | Annual grasses, some broadleaf weeds | Feb-March | ✅ Safe |
| Atrazine (various brands) | Broadleaf weeds, annual grasses (also has post-emergent activity) | Feb-March, fall application | ✅ Safe for most cultivars (see notes below) |
Pre-Emergent Application Guidelines:
- Timing is everything: Apply BEFORE weeds germinate (Feb-March in most St. Augustine zones)
- Soil temperature trigger: Apply when soil temps reach 50-55°F for 3+ consecutive days
- Don't seed/sod for 6-12 weeks: Pre-emergents prevent ALL seed germination, including grass seed
- Watering in: Apply 0.25-0.5 inches irrigation within 24 hours to activate
- Reapplication: Most products last 60-90 days, consider fall application for winter weeds
Post-Emergent Herbicides (Kill Existing Weeds)
Broadleaf Weed Control (Safe for St. Augustine):
| Product/Active Ingredient | Controls | Rate/Application | Notes |
|---|---|---|---|
| Atrazine | Dandelion, clover, chickweed, henbit, many others | 1-2 applications, spring/fall | ✅ BEST for St. Augustine broadleaf control. Safe for Floratam, Palmetto, Raleigh. ⚠️ May injure Captiva, Seville, other fine-textured types at high rates |
| 2,4-D + Dicamba + Mecoprop (3-way mix) | Wide range of broadleaf weeds | Spot treatment or broadcast | ⚠️ Use LOW RATES only (0.5-0.75x label rate). Test small area first. Some St. Augustine injury possible, especially in heat. |
| Metsulfuron (MSM, Manor, Blade) | Dollarweed, clover, many broadleaf weeds | Very low rates (0.25-0.5 oz per acre) | ✅ Safe, excellent for dollarweed. Expensive but effective. |
| Celsius, Certainty (combo products) | Broad spectrum broadleaf + some sedges | Per label rates | ✅ Safe, premium products. Expensive but effective on difficult weeds. |
Grassy Weed Control:
| Product/Active Ingredient | Controls | Application | Notes |
|---|---|---|---|
| Sethoxydim (Segment, Vantage) | Annual and perennial grassy weeds (NOT crabgrass after mature) | Spot treatment on actively growing weeds | ✅ Safe, selective grass herbicide |
| Foramsulfuron (Revolver) | Crabgrass, goosegrass, sandbur | Young weeds (2-3 leaf stage best) | ✅ Safe, excellent for summer annual grasses |
Sedge Control:
| Product/Active Ingredient | Controls | Application | Notes |
|---|---|---|---|
| Halosulfuron (Sedgehammer, Dismiss) | Yellow nutsedge, purple nutsedge | When sedges actively growing (summer) | ✅ Safe, industry standard for sedge control. May require 2-3 applications. |
| Sulfentrazone + Prodiamine (Dismiss South) | Sedges + pre-emergent control | Spring application | ✅ Safe, combination product |
Common St. Augustine Weeds & Specific Solutions
1. Dollarweed (Pennywort) - The St. Augustine Nemesis
Identification: Round, coin-shaped leaves (silver dollar size) on long stems, thrives in wet areas
Why it's common: St. Augustine's irrigation requirements create perfect dollarweed habitat. Overwatering makes it worse.
Solution:
- Primary control: Reduce irrigation frequency (dollarweed thrives in wet soil)
- Herbicide: Metsulfuron (MSM, Manor) - most effective. Atrazine also works but slower.
- Application: 2-3 applications 3-4 weeks apart, spring or fall when actively growing
- Prevention: Fix drainage issues, water deeply but infrequently
2. Crabgrass - Summer Annual Grass
Identification: Coarse-textured grass, grows in clumps, light green color, spreads rapidly in summer
Why it's a problem: Competes with St. Augustine, dies in winter leaving bare spots
Solution:
- PRIMARY STRATEGY: Pre-emergent (prodiamine, dithiopyr) in Feb-March BEFORE germination
- Post-emergent (if already present): Foramsulfuron (Revolver) on young crabgrass (2-4 leaf stage)
- Prevention: Thick St. Augustine + pre-emergent = no crabgrass. Don't mow too short (keeps St. Augustine thick).
3. Sedges (Yellow Nutsedge, Purple Nutsedge) - "Nut grass"
Identification: Grass-like but triangular stem (roll stem between fingers), grows faster than St. Augustine after mowing, yellow-green color
Why it's difficult: Underground nutlets resprout even after pulling. Thrives in wet poorly-drained soil.
Solution:
- Herbicide: Halosulfuron (Sedgehammer — check price →) - ONLY effective product. NOT killed by broadleaf herbicides.
- Application: 2-3 applications 4-6 weeks apart when sedges actively growing (summer)
- Prevention: Improve drainage (sedges love wet soil), core aerate compacted areas
- Don't pull: Pulling breaks nutlets underground, making problem worse. Use herbicide.
4. Clover (White Clover) - Broadleaf Weed
Identification: Three-leaf clusters, white flower heads, spreads by stolons, common in low-nitrogen lawns
Why it appears: Often indicates nitrogen deficiency (clover fixes its own nitrogen)
Solution:
- Herbicide: Atrazine (best), metsulfuron, or 3-way broadleaf killer (low rates)
- Application: Spring or fall when clover actively growing
- Prevention: Increase nitrogen fertilization (0.5-1 lb N per 1,000 sq ft in spring) - thick St. Augustine crowds out clover
5. Spurge (Spotted Spurge, Prostrate Spurge)
Identification: Low-growing, mat-forming, oval leaves often with red/purple spot, milky sap when broken
Why it's common: Thrives in hot weather, thin St. Augustine areas
Solution:
- Pre-emergent: Atrazine in early spring (prevents germination)
- Post-emergent: Atrazine, metsulfuron, or Celsius when small
- Prevention: Thick St. Augustine shades out spurge. Proper fertility and irrigation create competitive turf.
6. Dandelion, Chickweed, Henbit (Common Broadleaf Weeds)
Identification: Dandelion (yellow flowers, tap root), Chickweed (small white flowers, mat-forming), Henbit (purple flowers, square stem)
Solution:
- Herbicide: Atrazine (excellent control), metsulfuron, or 3-way broadleaf killer
- Timing: Fall application best (weeds small and actively growing)
- Hand-pulling: Effective for dandelions if population is small (get entire tap root)
Cultural Weed Prevention (The Foundation)
Reality check: Herbicides are band-aids. A thick, healthy St. Augustine lawn naturally prevents 70-80% of weed problems through competition.
1. Proper Mowing Height
Maintain 3-4 inches (NOT 2-2.5 inches like Bermuda)
Why it matters: Taller grass shades soil, prevents weed seed germination, creates thick turf that crowds out weeds
Scalping = weeds: Mowing too short thins St. Augustine, exposes soil to sunlight, allows weed germination
2. Adequate Nitrogen
Annual total: 3-4 lbs N per 1,000 sq ft per year
Why it matters: Nitrogen-deficient St. Augustine thins out, allowing weeds to establish. Proper fertility keeps grass competitive.
Spring boost: 0.5-1 lb N in April-May promotes rapid spring growth that outcompetes weeds
3. Proper Irrigation
Deep infrequent watering: 0.75-1 inch per week, 1-2 times per week
Avoid: Shallow frequent watering (encourages shallow-rooted weeds, dollarweed, crabgrass)
Don't overwater: Excessive moisture = dollarweed, sedges, other water-loving weeds
4. Fill Bare Spots Quickly
Bare spot = weed opportunity: Weeds colonize thin/bare areas within days
Solution: Plug or sod bare spots immediately, fertilize thin areas to encourage stolon spreading
Prevention: Address issues causing thin grass (shade, disease, insects, traffic) before weeds establish
Annual Weed Control Program for St. Augustine
February-March (Pre-Emergent Window)
- Primary task: Apply pre-emergent (prodiamine or dithiopyr) BEFORE soil temps reach 55°F
- Timing: When forsythia blooms in your area, or late Feb/early March in zones 8-9
- Also apply: Atrazine if broadleaf weeds present (dual pre + post activity)
- Result: Prevents crabgrass, goosegrass, annual bluegrass, many broadleaf weeds for 60-90 days
April-May (Spring Growth)
- Primary task: Promote thick St. Augustine growth with 0.5-1 lb N fertilization
- Spot-treat: Any emerged broadleaf weeds with atrazine or metsulfuron
- Monitor: Check for crabgrass breakthrough (treat young crabgrass with foramsulfuron if needed)
June-August (Summer Maintenance)
- Sedge control: Treat nutsedge with halosulfuron (Sedgehammer) when actively growing
- Dollarweed: Spot-treat with metsulfuron, reduce irrigation if present
- Summer grassy weeds: Foramsulfuron on any breakthrough crabgrass/goosegrass
- Maintain thick turf: Proper watering, mowing height 3-4 inches
September-November (Fall Control)
- Broadleaf control: Atrazine application for winter annual weeds (henbit, chickweed, clover)
- Second pre-emergent: Optional fall application of prodiamine for winter annual control
- Fall fertilization: 0.5-0.75 lb N promotes thick fall growth going into winter
Weed Control Success Formula
Primary Strategy (70-80% of Weed Control):
Thick Healthy St. Augustine = Natural Weed Prevention
- Mow at 3-4 inches (NOT shorter)
- Fertilize 3-4 lbs N annually (don't let grass thin from nitrogen deficiency)
- Deep infrequent watering (avoid creating wet conditions weeds love)
- Fix bare/thin spots immediately
Chemical Strategy (20-30% - Backup Tool):
Pre-Emergent (Feb-March) + Spot-Treat Problem Weeds
- Pre-emergent: Prodiamine in Feb-March prevents 90% of summer annual grasses
- Atrazine: St. Augustine-safe broadleaf control (spring + fall applications)
- Halosulfuron: Sedge control when needed (summer)
- Metsulfuron: Dollarweed specialist
Bottom line: You cannot spray your way to a weed-free lawn if the St. Augustine is thin. Cultural practices create competitive turf that naturally crowds out weeds. Herbicides are supplemental tools for problem weeds, not the primary strategy.
Common St. Augustine Grass Problems & Solutions
St. Augustine is relatively low-maintenance, but understanding these common issues helps you maintain a perfect lawn with minimal effort.
Slow Establishment from Plugs (12-24 Months)
Issue:
This isn't a problem - it's St. Augustine's nature. Plugs take 12-24 months to fill in completely. Many homeowners get impatient and think something is wrong.
What's Normal:
- Months 1-3: Plugs establish roots, minimal visible spreading
- Months 4-8: Visible stolons (runners) begin spreading 1-2" per month
- Months 9-18: Aggressive spreading during second summer, gaps closing
- Months 18-24: Full coverage achieved (12" spacing), earlier if 6-8" spacing
Speed Up Establishment:
- Fertilize lightly (0.5 lb N per 1000 sq ft) monthly May-August to encourage spreading
- Water 2-3x per week to keep soil moist (not saturated)
- Keep weeds controlled - they compete with plugs for nutrients
- Be patient - St. Augustine rewards patience with decades of low-maintenance beauty
Excessive Thatch Buildup (Spongy Lawn)
Symptoms:
Lawn feels spongy, thick brown layer (>0.5") between grass and soil, water doesn't penetrate well.
Causes:
- St. Augustine's natural dense growth produces more thatch than Bermuda
- Low fertilization slows microbial decomposition
- Acidic soil (pH below 5.5) slows decomposition
Solutions:
- For thatch ½-1": Core aerate in late May with 2-3 passes. Topdress with ¼" compost. Repeat annually.
- For thatch >1": Power dethatch (vertical mow) in late May when St. Augustine growing vigorously. Remove debris. Follow with aeration and topdressing.
- Annual prevention: Dethatch every spring with manual rake ($25) or power dethatcher rental ($40-60). Takes 30-45 min per 1,000 sq ft.
Very Slow Spring Green-Up
Issue:
St. Augustine breaks dormancy 2-3 weeks later than Bermuda and greens up slowly over 4-6 weeks. This is normal but frustrating for homeowners.
What's Normal:
- Late April: First green tinges appear (soil 65-70°F)
- May: 30-60% green, patchy appearance
- Early June: Fully green and growing actively
Speed Up Green-Up (Slightly):
- Apply 0.5 lb N per 1,000 sq ft when 30% green (early May)
- Water lightly to keep soil moist once greening begins
- Avoid walking on lawn during transition - damages emerging shoots
- Accept reality: St. Augustine will never green up as fast as Bermuda. Choose St. Augustine for low maintenance, not fast spring green-up.
Gray/Brown Leaf Tips After Mowing
Symptoms:
Lawn looks grayish or brown-tipped after mowing, not the clean green look expected.
Cause:
Dull mower blade. St. Augustine's tough, wiry blades tear easily with dull blades, leaving ragged gray/brown tips.
Solution:
- Sharpen blade immediately - take to hardware store ($10-15) or DIY with file ($15 for file, 15 min to sharpen)
- After sharpening, lawn will look green again within 3-5 days as new growth emerges
- Prevention: Sharpen blade every 15-20 mowing hours (every 5-6 weeks during peak season). Keep spare blade on hand for quick swaps.
Brown Patch Disease (Circular Dead Spots)
Symptoms:
Circular brown patches 1-3 feet diameter, often with darker "smoke ring" border. Appears in humid weather.
Causes:
- Excess nitrogen + humidity + warm days/cool nights (June-August)
- Evening watering (leaves stay wet overnight)
- Poor air circulation, shade
Solutions:
- Fungicide treatment: Apply azoxystrobin (Heritage) or propiconazole every 14-28 days until controlled
- Cultural fixes: Reduce nitrogen to 1.5 lbs N/year max. Water early morning only (5-9am). Improve air circulation by pruning shrubs.
- Prevention: Don't over-fertilize. St. Augustine on 1.5-2 lbs N annually rarely gets brown patch. Avoid watering in evening.
St. Augustine Grass FAQs
The most common questions about St. Augustine grass, answered with specific details.
How long does St. Augustine grass take to establish from plugs?
St. Augustine grass plugs take 12-24 months to establish full coverage, depending on spacing and care. At 6-8" spacing (closer), expect 12-18 months. At 12" spacing (standard), expect 18-24 months. This is significantly slower than Bermuda grass (8-12 weeks from seed) but results in superior long-term performance. During establishment: fertilize lightly (0.5 lb N per 1000 sq ft) monthly May-August, water 2-3x per week, control weeds aggressively, and be patient. The second summer (months 12-24) shows the most dramatic spreading as the root system matures. St. Augustine from sod provides instant coverage but costs 2-3x more than plugs.
Why is my St. Augustine grass slow to green up in spring?
St. Augustine grass requires warmer soil temperatures (65-70°F) to break dormancy compared to Bermuda grass (60-65°F), resulting in 2-3 weeks later green-up. This is normal St. Augustine behavior, not a problem. Green-up timeline: late April (first green tinges in zones 7-8), May (30-60% green, patchy appearance), early June (fully green). You cannot force faster green-up, but you can help slightly by applying 0.5 lb N per 1000 sq ft when grass is 30% green (early May) and watering lightly to keep soil moist. The slow green-up is a trade-off for St. Augustine's low maintenance during summer. If year-round green is priority, overseed with ryegrass in fall or choose cool-season grass.
Can I overseed St. Augustine grass with ryegrass for winter color?
No, overseeding St. Augustine with ryegrass is NOT recommended and often fails. Unlike Bermuda grass, St. Augustine's dense growth prevents ryegrass seed from contacting soil, resulting in poor germination. Additionally, ryegrass competes aggressively with St. Augustine in spring, delaying green-up and potentially thinning the St. Augustine stand. If you must have winter green, consider these alternatives: Accept brown dormancy (4-5 months in zones 7-8); Paint dormant St. Augustine with turf colorant (green dye lasts 2-3 months, safe for grass); Install St. Augustine in back yard (where you use it) and use ryegrass or Tall Fescue in front yard (for curb appeal); Choose different grass - Kentucky Bluegrass or Tall Fescue stay green year-round in transition zones.
How often should I fertilize St. Augustine grass?
St. Augustine grass needs only 2-3 fertilizer applications per year, totaling 1.5-2.5 lbs nitrogen per 1000 sq ft annually. Recommended schedule: Application #1 - Late April (0.5 lb N) when 50% green; Application #2 - June (0.75-1 lb N) peak feeding; Application #3 (optional) - Late July (0.5 lb N) if color fading. Use slow-release nitrogen fertilizer (16-4-8 or 15-5-10 with 50%+ slow-release) to prevent growth spikes and thatch buildup. Over-fertilizing St. Augustine (>3 lbs N annually) causes excessive thatch, disease susceptibility, weak growth, and defeats St. Augustine's low-maintenance advantage. For enhanced color without extra fertilizer, apply iron (chelated liquid iron) every 3-4 weeks May-August.
What is the best way to control thatch in St. Augustine grass?
St. Augustine builds thatch faster than other grasses due to dense growth and slow decomposition. Best thatch management: Annual spring dethatching - Use manual dethatching rake ($25) or rent power dethatcher ($40-60) in late April/early May when St. Augustine growing vigorously. Remove debris and compost. Core aeration - Aerate with 2-3 passes in late May, topdress with ¼" compost to introduce beneficial microbes that decompose thatch. Prevent buildup - Don't over-fertilize (keep total N under 2.5 lbs/year), maintain soil pH 6.0-6.5 for optimal microbial activity, bag clippings occasionally (every 3rd mowing). Measure thatch depth annually - Cut small plug, measure brown layer. Under ½" is healthy, ½-1" needs aeration, over 1" needs power dethatching.
Is St. Augustine grass pet-friendly and tolerant of dog urine?
St. Augustine has moderate dog urine tolerance - better than cool-season grasses but similar to Bermuda. It will develop burn spots from concentrated nitrogen/salts but recovers within 3-4 weeks due to slow but steady spreading growth. Prevention: Water urine spots immediately after dog pees (dilutes nitrogen), train dogs to use specific potty area (mulch or gravel), provide fresh water (produces more dilute urine), supplement dog diet with urine-reducing products. Repair burned spots: Flush area with water daily for 3 days to leach salts, apply gypsum to displace sodium, fertilize lightly (0.25 lb N per 1000 sq ft) to encourage surrounding St. Augustine to spread in. Most spots recover naturally in 3-4 weeks without reseeding. St. Augustine's dense turf also withstands dog traffic and digging better than most grasses.
Can St. Augustine grass grow in shade?
St. Augustine has GOOD shade tolerance compared to Bermuda but still needs 4-6 hours of direct sunlight daily for healthy growth. Shade performance: 6-8 hours sun (full sun) - excellent density and color; 4-6 hours sun (light-moderate shade) - good performance, slightly thinner than full sun but acceptable; 2-4 hours sun (moderate-heavy shade) - poor performance, thin and weak; Less than 2 hours - will not survive. Tips for shaded St. Augustine: Mow higher (2-2.5") to capture more light, fertilize less (1-1.5 lbs N annually), improve light by pruning tree canopy, choose shade-tolerant cultivars like Raleigh or Palmetto. For areas with heavy shade (less than 4 hours), choose St. Augustine grass (warm-season) or Fine Fescue (cool-season) instead.
How much does it cost to install 5,000 sq ft of St. Augustine grass?
Installing 5,000 sq ft of St. Augustine grass costs: DIY Plugs (budget option) - $1,000-1,500 total ($200-300 per 1000 sq ft). Includes 600-750 plugs at $120-250, soil prep $150-200, starter fertilizer $75-100, water $100, weed control $75. Takes 12-24 months to establish. DIY Sod (instant results) - $2,500-3,500 total ($500-700 per 1000 sq ft). Includes St. Augustine sod $2,000-3,000, soil prep $200, fertilizer $100, roller rental $150. Instant coverage. Professional Installation - Sod installed by professionals: $4,000-6,500 total ($800-1,300 per 1000 sq ft). Includes materials and labor. Plugs are cheapest but require patience. Sod costs 2-3x more but provides instant lawn. Despite higher upfront cost, St. Augustine saves $40-80 annually vs Bermuda due to lower maintenance, recovering initial investment in 5-7 years.
When does St. Augustine grass go dormant and turn brown?
St. Augustine grass enters dormancy when soil temperatures drop below 50-55°F, typically late October to mid-November in zones 7-8. Timing by zone: Zone 6 - late October, fully brown by mid-November; Zone 7 - early-mid November, brown by late November; Zone 8 - mid-late November, brown by early December; Zone 9 - partial dormancy December-January, may stay semi-green; Zone 10-11 - minimal to no dormancy, stays green year-round. St. Augustine stays dormant until soil reaches 65-70°F in late April to May. Dormancy period is 1-2 weeks longer than Bermuda in both fall and spring. During dormancy, avoid foot traffic on frozen grass to prevent crown damage. St. Augustine's dormancy is the trade-off for its low-maintenance summer performance.
Why does my St. Augustine look gray or brown after mowing?
Gray or brown-tipped St. Augustine after mowing indicates a dull mower blade. St. Augustine's tough, wiry blades tear (rather than cut cleanly) when the mower blade is dull, leaving ragged gray/brown tips visible from 10+ feet away. This is THE #1 mowing mistake with St. Augustine. Solution: Sharpen mower blade immediately (hardware store charges $10-15, or DIY with $15 file in 15 minutes). After sharpening, lawn will look green again in 3-5 days as new growth emerges. Prevention: Sharpen blade every 15-20 mowing hours (every 5-6 weeks during peak season). St. Augustine's dense texture dulls blades 20-30% faster than other grasses. Keep spare blade on hand for quick swaps. Check blade sharpness: After mowing, look closely at grass tips. Clean green edges = sharp blade. Torn brown/gray edges = dull blade.
About the Expert
[Photo: Anton Schwarz]
Anton Schwarz
Landscape & Turfgrass Specialist
15+ years of professional turfgrass management
Credentials & Experience
- Education: Bachelor of Science in Horticulture, Turfgrass Management specialization
- Certifications: Certified Landscape Professional (CLP), Licensed Pesticide Applicator
- Experience: 15+ years managing residential and commercial landscapes across zones 6-10
- Specialization: Warm-season turfgrass establishment, low-maintenance lawn design
- St. Augustine Expertise: Installed and maintained over 300,000 sq ft of St. Augustine grass lawns, specializing in plug establishment and thatch management
Anton Schwarz has spent over a decade and a half perfecting low-maintenance warm-season lawn care, with particular expertise in St. Augustine grass for busy homeowners. Having worked across zones 6-10, Anton has hands-on experience with St. Augustine in diverse climates and soil types.
This comprehensive St. Augustine grass guide draws on Anton's field experience with hundreds of St. Augustine installations, from budget plug projects to premium sod installations. The recommendations reflect real-world testing of techniques, products, and maintenance schedules for achieving beautiful St. Augustine lawns with minimal time investment.
How This Guide Was Created
- Field Testing: 15+ years hands-on experience with St. Augustine establishment, maintenance, and problem-solving
- Cost Analysis: Tracked actual costs from 200+ St. Augustine installations (plugs and sod) to provide accurate pricing
- Maintenance Tracking: Documented time savings and cost comparisons vs Bermuda and cool-season grasses
- University Research: Incorporates findings from Texas A&M, UGA, NC State turfgrass programs
- Climate-Specific Knowledge: Experience in zones 6-10 provides regional customization
- Problem-Solving Focus: Addresses actual problems clients faced over 1,000+ St. Augustine lawn consultations
Ready to Start Your St. Augustine Lawn?
Calculate exactly how much sod or seed you'll need for your property.
Get Your Free Quote →